Tech
Clothing photography: The complete guide to shooting, editing, and scaling with AI


How do you build a clothing photography workflow that produces accurate, professional images without turning every new SKU into another full-scale shoot?
This guide walks you through the full process: preparing a garment, shooting it, editing it by hand, and using AI fashion tools to extend a single source photo into everything your store, marketplace, and ad channels need.
Need AI fashion photography at scale?
Produce high volumes of on-model and product visuals without slowing down launches. Use our API to automate fashion image workflows or work with our team on a custom pipeline tailored to your operations.
Types of clothing photos
Common types of clothing photography include:
- Flatlay: the garment is arranged on a flat surface and photographed from above
- Hanging: the garment is photographed on a hanger against a wall or backdrop
- Ghost mannequin: the garment is shaped on a mannequin, then edited to make the mannequin invisible
- On-model: a person wears the garment to show fit, proportion, and styling
- Lifestyle: the garment appears in a real or designed setting for ads, social media, and campaign pages
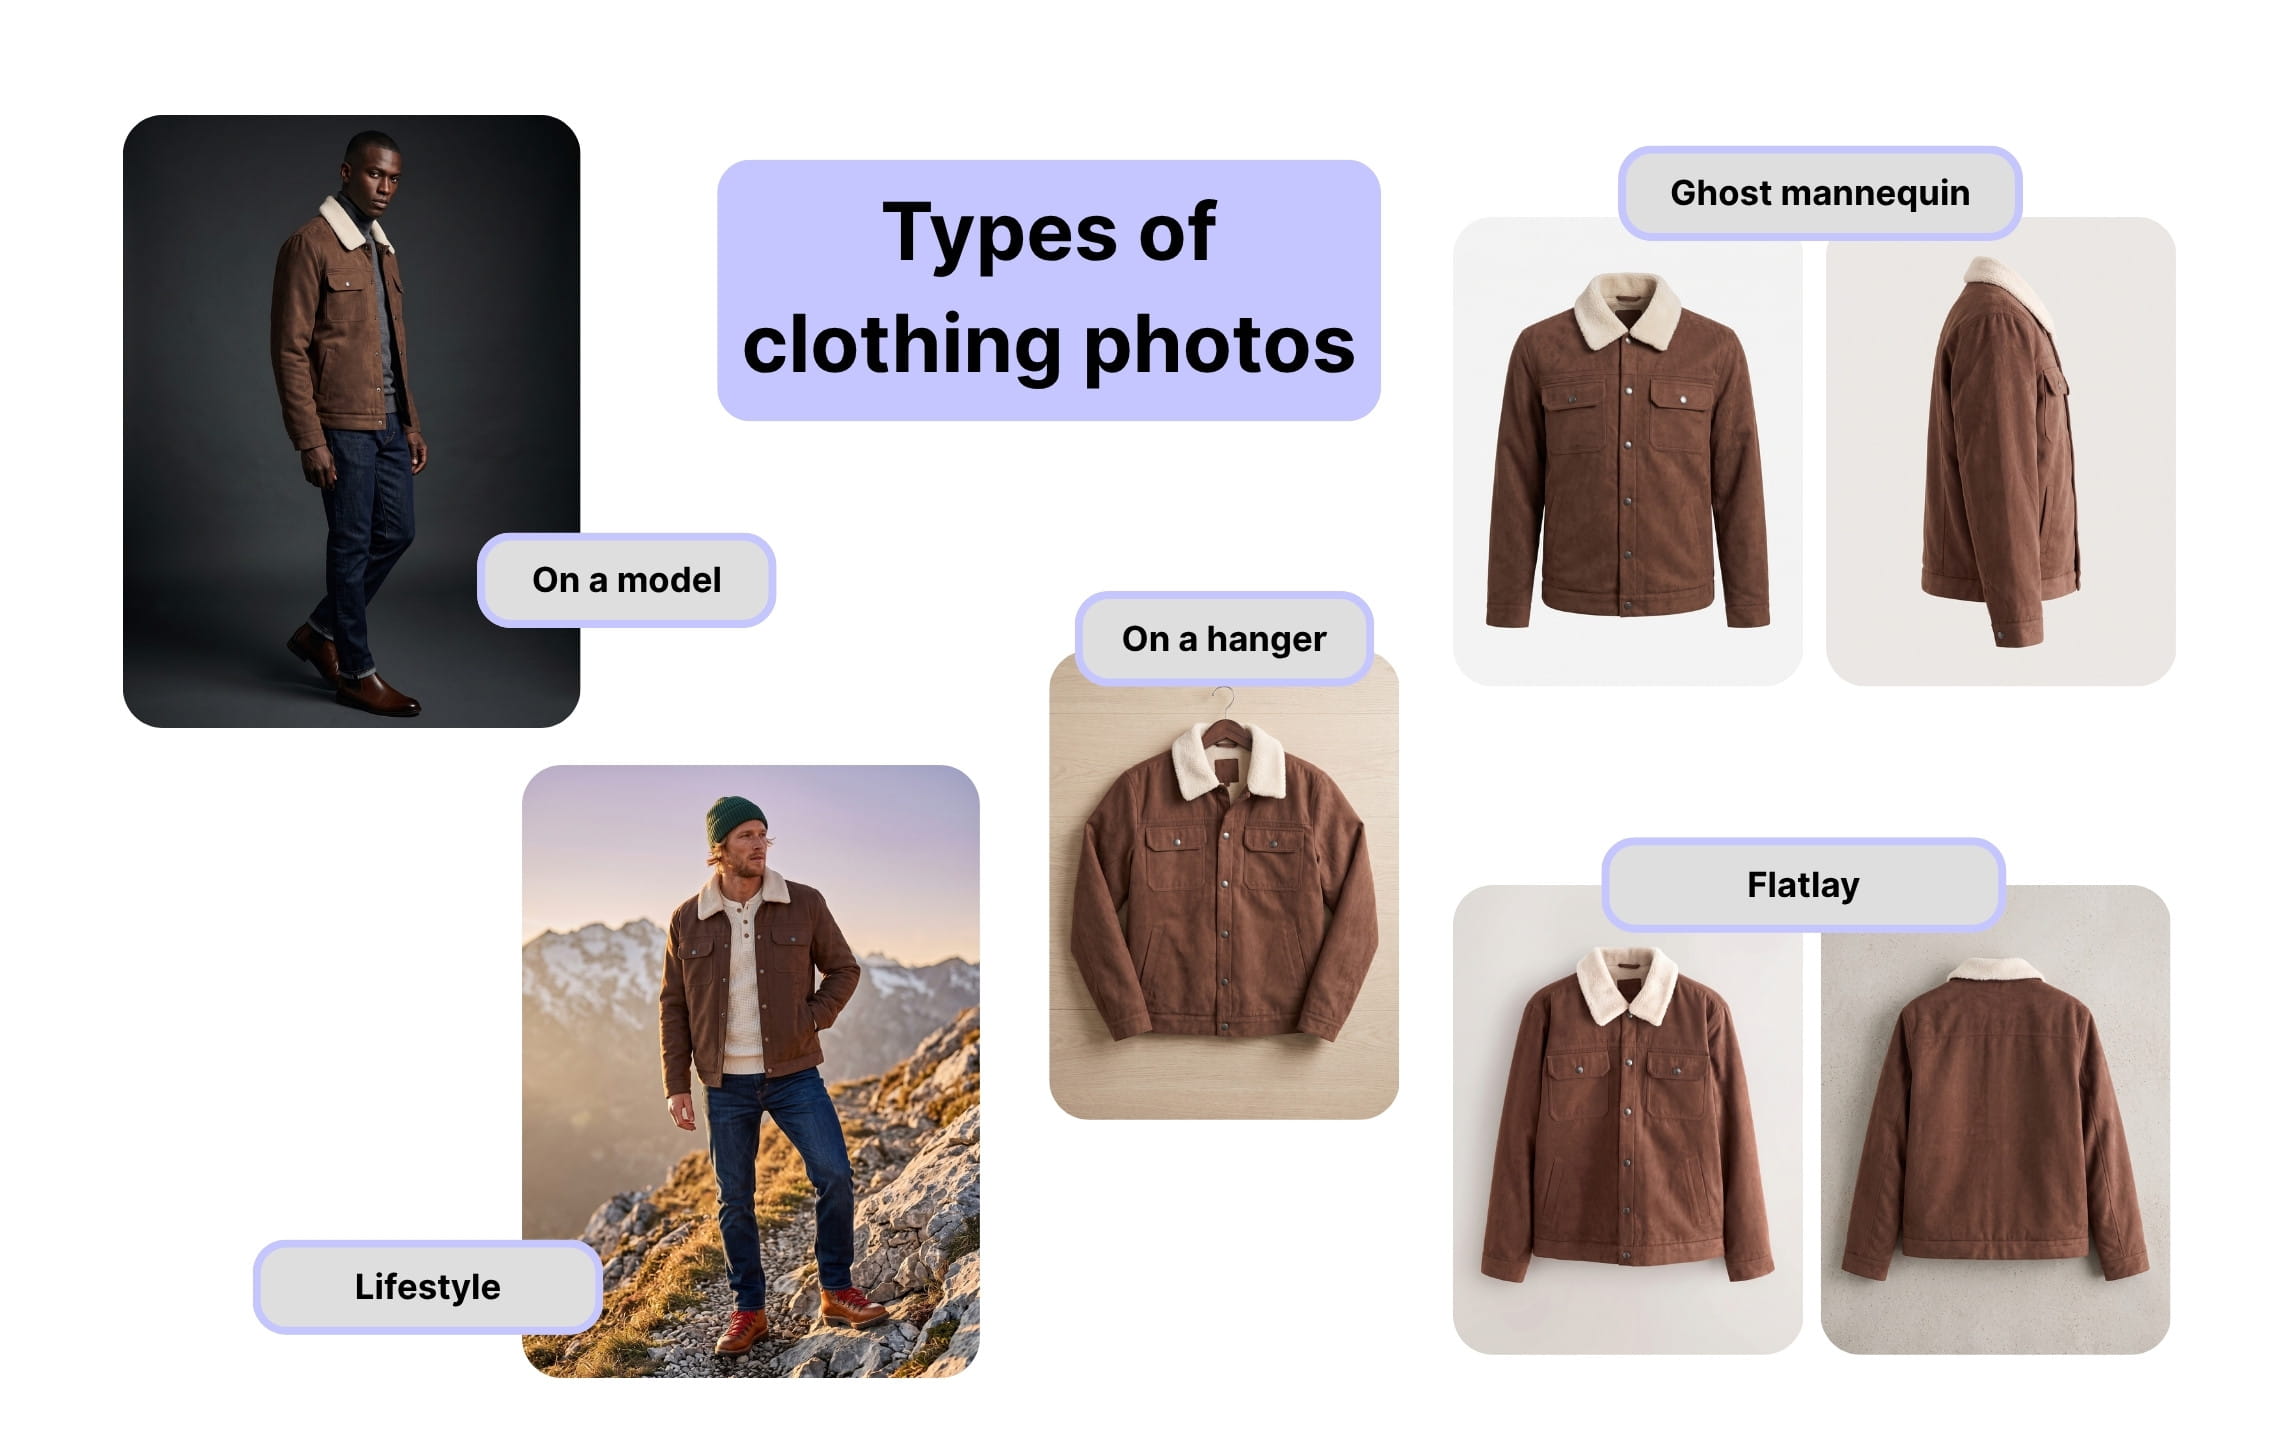
For most online stores, one format isn't enough. A practical product gallery might combine a clean front image, back and detail views, and one or two on-model or lifestyle photos.
Once you know which formats you need, there are two ways to produce them: shoot and edit each one yourself, or shoot one clean source image and let AI generate the rest.
What you need for a DIY clothing photography setup
Start with a simple setup you can reproduce for every item. Consistency matters more than owning expensive equipment, whether you're shooting a full catalog by hand or capturing the clean source images you'll later feed into AI.
Camera
A mirrorless camera or DSLR gives you more control, but a recent phone can produce useful product images in good light. Use the main rear camera rather than a wide-angle lens, portrait mode, or digital zoom. Those modes can distort the garment or blur its edges.
If you're using a camera, a standard focal length is the safest choice. Around 50 to 85 mm on a full-frame camera helps keep proportions natural. Mount the camera on a tripod so its height, angle, and distance stay fixed.
Lighting
The easiest setup is one large, soft light placed about 45 degrees to the garment. A window with indirect daylight can work, but its brightness and color will change during the day. A softbox or diffused LED is easier to repeat across a large catalog.
Place a white foam board opposite the light to soften shadows. For dark fabrics, move the reflector closer. For white or reflective pieces, move it farther away if the image starts to look flat.
Avoid mixing window light, ceiling lights, and lamps. Different light sources produce different color casts, which makes accurate editing much harder.
Background and support
Use a clean, matte background with enough contrast to define the garment's edges. White or light gray works for most marketplaces. A contrasting neutral background can make white garments easier to select during editing.
Depending on the shot, you'll also need:
- A sturdy hanger with a shape that suits the garment
- A tabletop, floor sweep, or large sheet of card for flatlays
- Pins, clips, and removable tape to control the shape
- A lint roller and steamer
- A mannequin for structured or ghost mannequin photography
- A gray card or color checker for consistent white balance and color
Why this matters even if you plan to use AI: a clean, evenly lit, accurately colored source photo is what makes an AI-generated on-model or lifestyle image look right. AI can extend a good photo or correct a bad white balance, but it also can invent details that are not in the product if the initial photo is of poor quality.
How to photograph clothing step by step
1. Prepare the garment
The fastest edit is the one you don't need to make. Steam or iron the garment, remove lint and loose threads, close the intended buttons or zips, and check that labels, cuffs, collars, and hems sit correctly.
Compare the sample against the product specification before shooting. If a sleeve is rolled, a belt is missing, or the garment is clipped into an unrealistic shape, the photo may look good while misrepresenting the product.
2. Choose the right shooting style
Use the product and sales channel to decide how to shoot it.
- Choose flatlay for T-shirts, knitwear, children's clothing, simple bottoms, and fast catalog production.
- Choose hanging photography for dresses, shirts, jackets, and garments whose natural drape matters.
- Choose ghost mannequin photography for a structured, three-dimensional shape without a visible model.
- Choose on-model photography when fit, scale, movement, or styling will affect the buying decision.
- Choose lifestyle photography for campaign images and social content, after the basic product views are covered.
Flatlays and ghost mannequin shots are also the best source images if you plan to create on-model photos with AI.
3. Lock the camera position
Keep the sensor parallel to the garment. If the camera points up, down, or across the product at an angle, straight seams can converge and the garment's proportions can change.
For a flatlay, position the camera directly overhead. For a hanging, mannequin, or model shot, place it around the middle of the garment and level it carefully. Mark the tripod and product positions on the floor if you're shooting multiple SKUs.
Leave some space around the product. You can crop later, but recovering clipped sleeves or hems is much harder.
4. Set exposure and color
When using a camera, start with:
- ISO 100 or the camera's lowest standard ISO for a clean file
- An aperture around f/8 to f/11 for front-to-back detail
- A shutter speed that gives the correct exposure, since the tripod prevents camera shake
- RAW capture if available, for more control over color and highlights
- Manual white balance or a custom reading from a gray card
On a phone, tap and hold to lock focus and exposure if the camera app allows it. Lower the exposure slightly when photographing white clothing so the fabric texture doesn't disappear into a bright patch.
Check the histogram or highlight warning after the first shot. White fabric should look white but still show weave, stitching, and folds. Black fabric should retain texture instead of becoming a solid dark shape.
5. Shape the garment honestly
Arrange the garment so it looks neat without changing its real cut.
For flatlays, align shoulder seams, smooth the torso, place sleeves consistently, and use small folds to show volume where helpful. For hanging shots, make sure the hanger doesn't stretch the shoulders or distort the neckline. For mannequin shots, use clips only to recreate the intended fit, not to make the waist or silhouette appear slimmer than it is.
If the front and back differ, photograph both. For complex details such as linings, fastenings, pockets, embroidery, ribbing, or fabric texture, add close-ups rather than expecting one wide image to explain everything.
6. Follow a repeatable apparel shot list
A basic ecommerce shot list can include:
- Front view
- Back view
- Side or three-quarter view when shape matters
- Fabric and texture close-up
- Construction detail, such as a zip, cuff, pocket, or neckline
- Label or branding detail
- On-model view to show fit and scale
- Lifestyle or styled image for context
Use the same framing and sequence for each product in a category. This makes the store easier to browse and speeds up editing.
7. Review before breaking down the setup
Zoom in and check:
- Is the full garment sharp?
- Are the color and brightness believable?
- Can you see texture in the lightest and darkest areas?
- Are the front, back, and detail views complete?
- Are there wrinkles, dust, clips, or support equipment that should not be visible?
- Does the image show the garment's real length and shape?
Fixing one missed detail now is faster than rebuilding the setup tomorrow.
How to edit clothing photography
Edit one representative image first. Once it looks right, apply the same base settings to the rest of the set and make smaller corrections image by image.
AI photo editors can now handle much of this routine work, including basic color and exposure correction, background removal, cropping, resizing, and image expansion. They can make apparel photography faster, especially when you have many similar products. But use AI tools with caution and compare every result with the source image and the physical product.
1. Correct white balance
Use the gray card shot as a neutral reference. If you didn't capture one, find a genuinely neutral area in the scene, then compare the result with the physical garment under neutral light.
Don't rely on making the background perfectly white by shifting the whole image toward blue or yellow. That can fix the background while making the garment color wrong.
With AI: Color correction tools can neutralize a color cast in one click. They work best when the image contains a true white, gray, or black reference.
2. Adjust exposure without losing fabric detail
Set the overall exposure, then recover bright and dark detail with highlight and shadow controls. Use contrast carefully. Heavy contrast can make black fabric look richer on screen while hiding the weave, or make light fabric lose subtle stitching.
Inspect difficult areas at 100% magnification. Watch for white lace, satin highlights, dark denim, velvet, and any fabric with reflective thread.
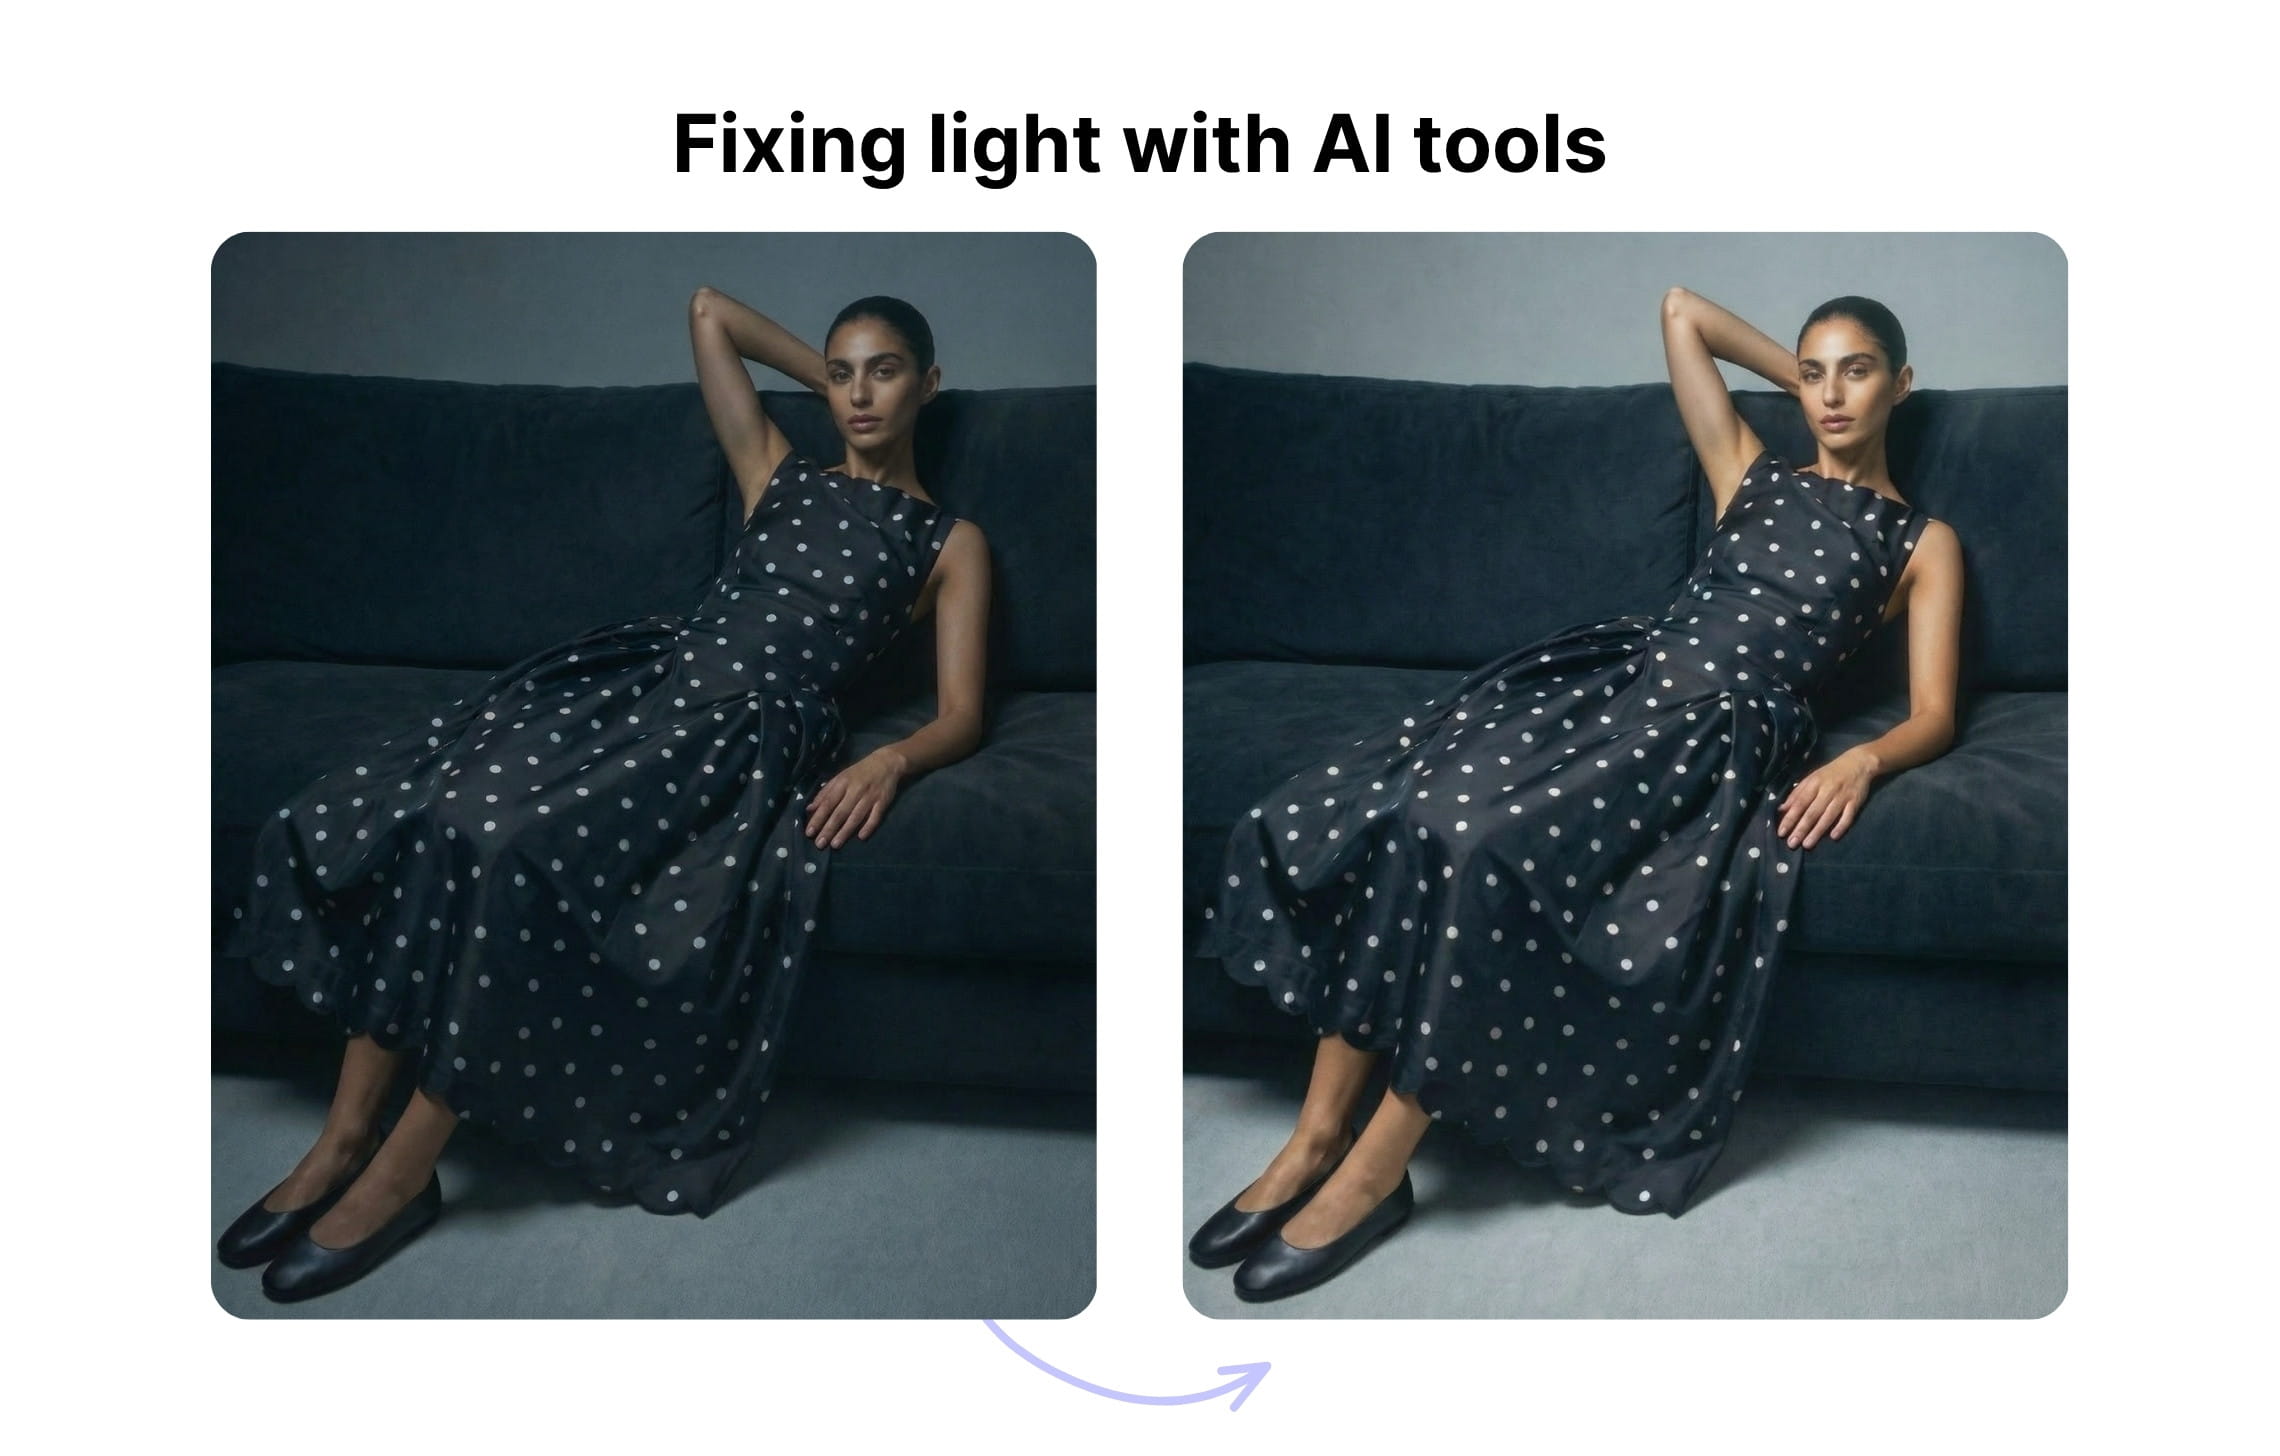
With AI: Light fix tools can balance exposure, open shadows, and recover highlights automatically. This is useful for processing a batch shot under the same lighting. The limitation is that software may optimize the image for visual impact rather than product accuracy.
3. Match the real product color
Accurate color is part of the product information. Compare the edited photo with the sample in controlled light and, when possible, on a calibrated display.
Use targeted color controls instead of global saturation. If a red dress looks too orange, adjust the relevant hue rather than cooling the entire image. Keep skin tones separate from garment corrections in on-model shots.
For large catalogs, save a color reference and editing notes for each collection or fabric batch. This reduces drift between shoot days.
4. Clean distractions
Remove dust, sensor spots, stray threads, temporary pins, and backdrop marks. Keep natural fabric texture, construction details, and real seams. Over-smoothing can make knitwear, denim, leather, and embroidery look synthetic.
Be equally careful with garment shape. Retouching should not change the length, neckline, fit, pattern placement, or other features a customer will receive.
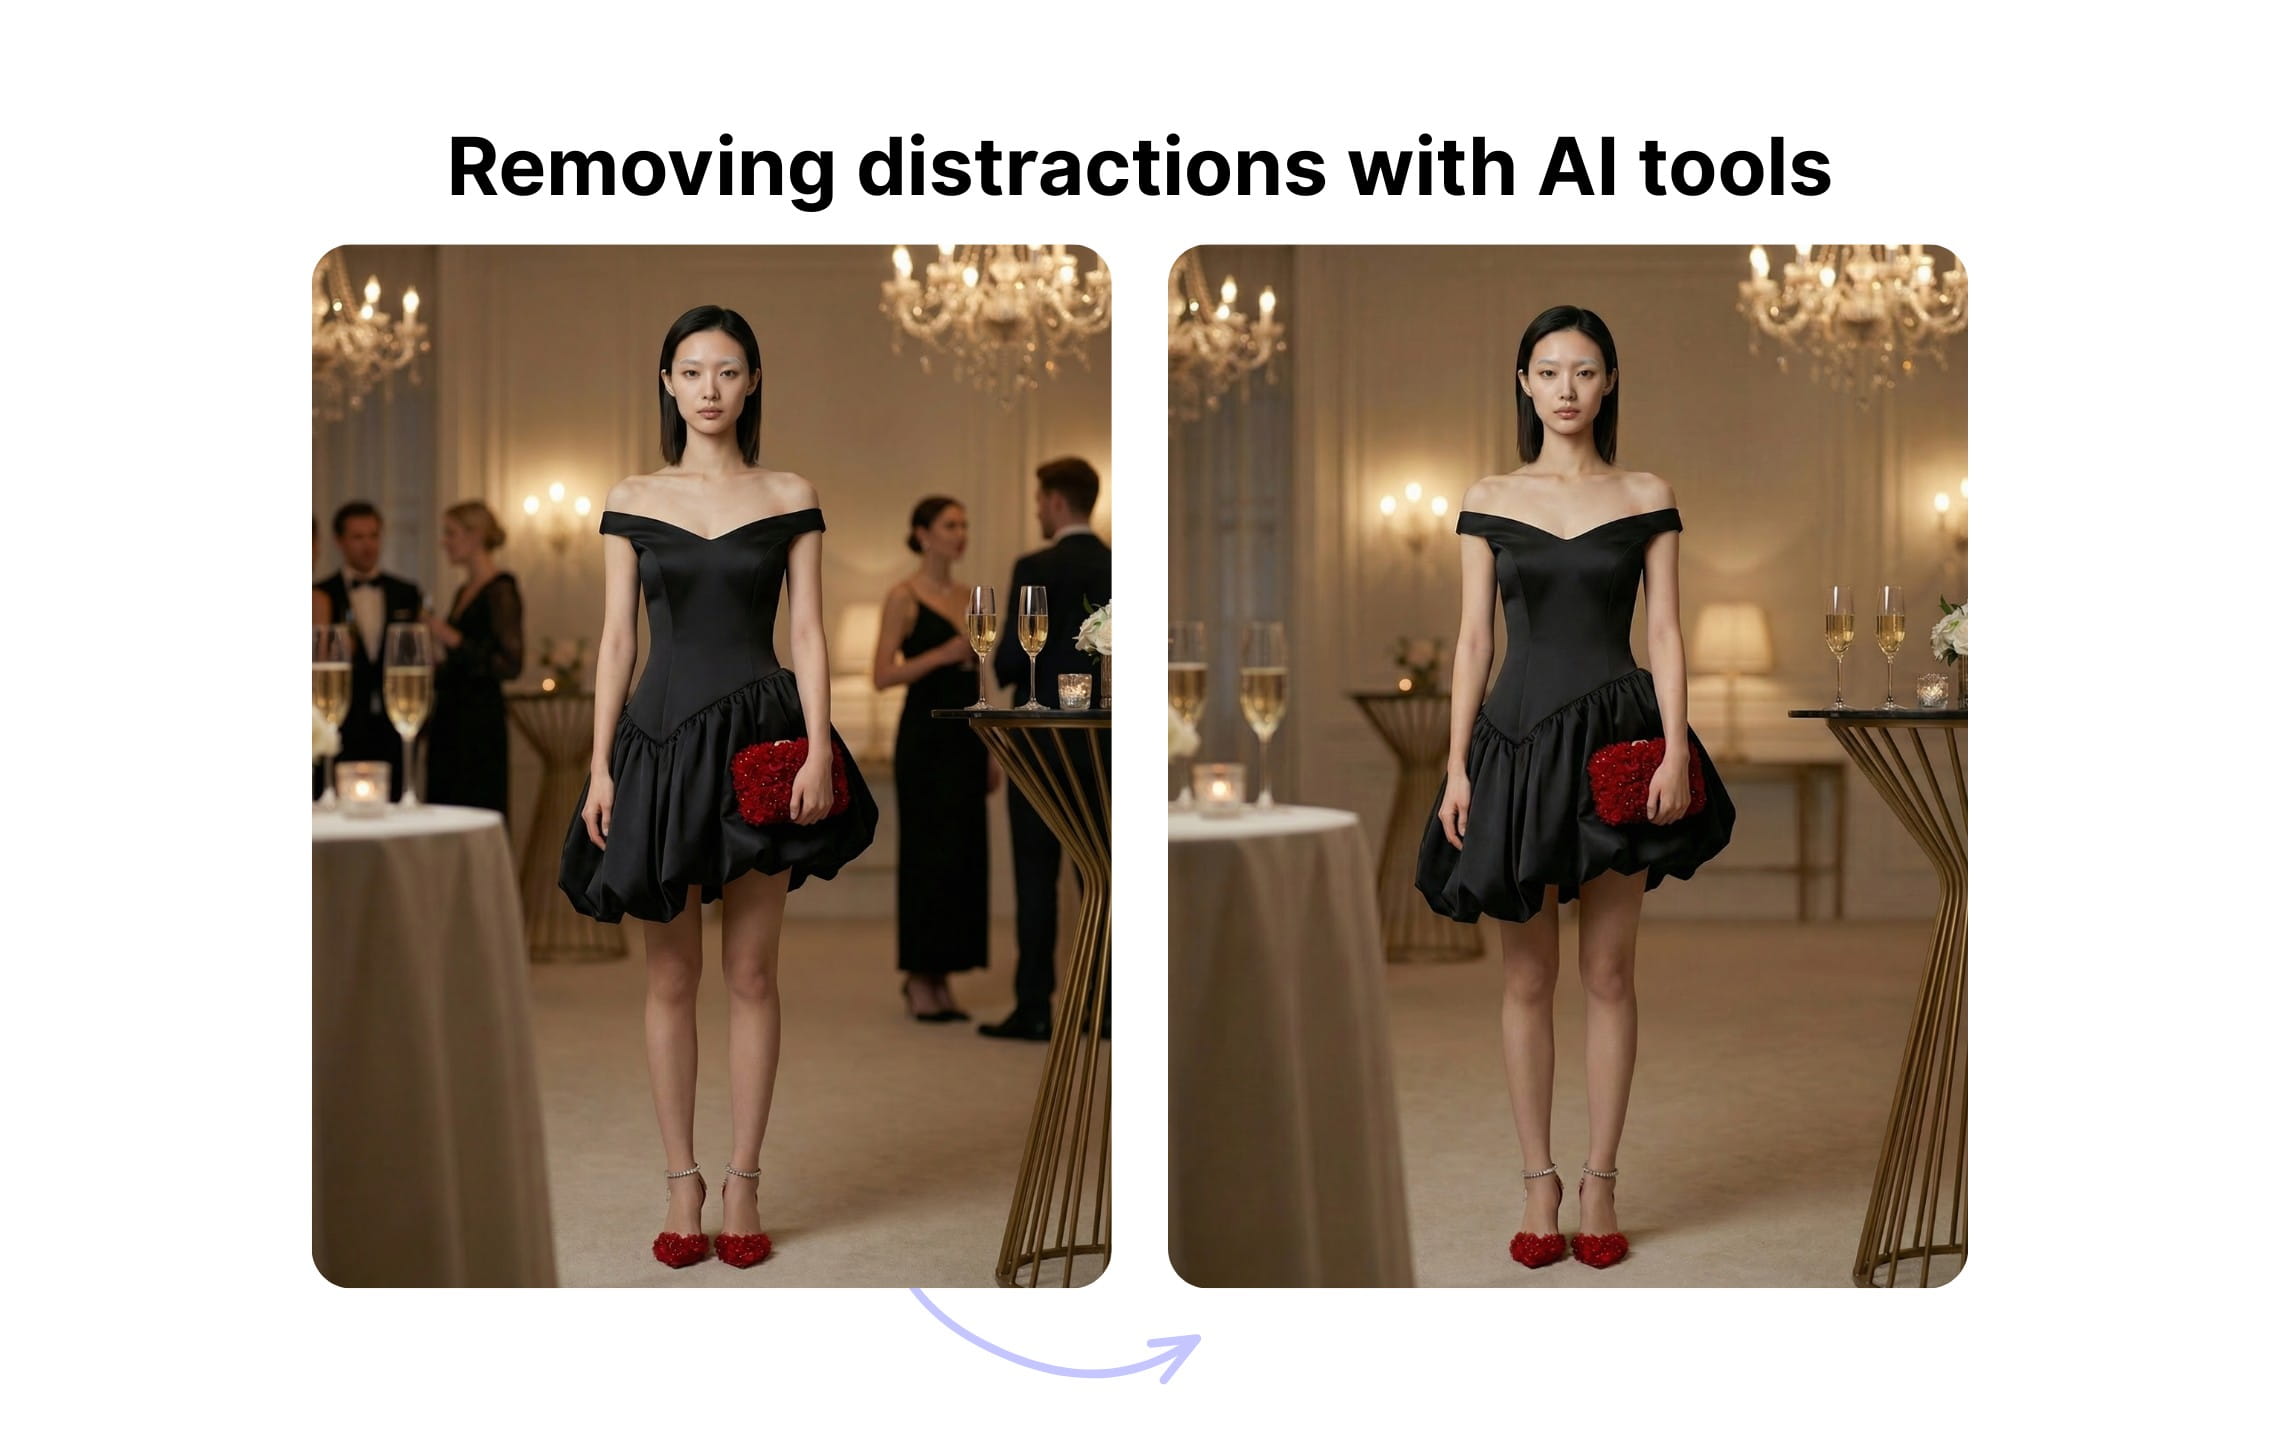
With AI: Photo cleanup tools are good at clearing isolated dust, tape, clips, and background marks. Use a small selection and review the repaired area at full size.
5. Remove or standardize the background
For a marketplace or product detail page, isolate the garment with a clean edge and place it on the required white, off-white, or transparent background. Check fine edges around lace, fringe, fur, mesh, and loose fibers at full size.
Match the grounding across the catalog. A very soft contact shadow can stop a ghost mannequin image from looking pasted on, but the shadow direction and strength should stay consistent.
With AI: Background-removal tools can cut out a simple garment in seconds and apply the same background across a catalog. They are usually reliable when the product has a clear outline and strong contrast with the original background.
6. Align, crop, and resize
Straighten the image and give similar products the same visual scale. Aligning every item only by its outer bounding box can make a short top look too large next to a long coat, so use category-specific templates.
Keep the full-resolution master, then export copies for each sales channel. Use the required aspect ratio, pixel dimensions, file type, background, and file-size limit. Convert to sRGB for predictable web color unless a channel specifies otherwise.
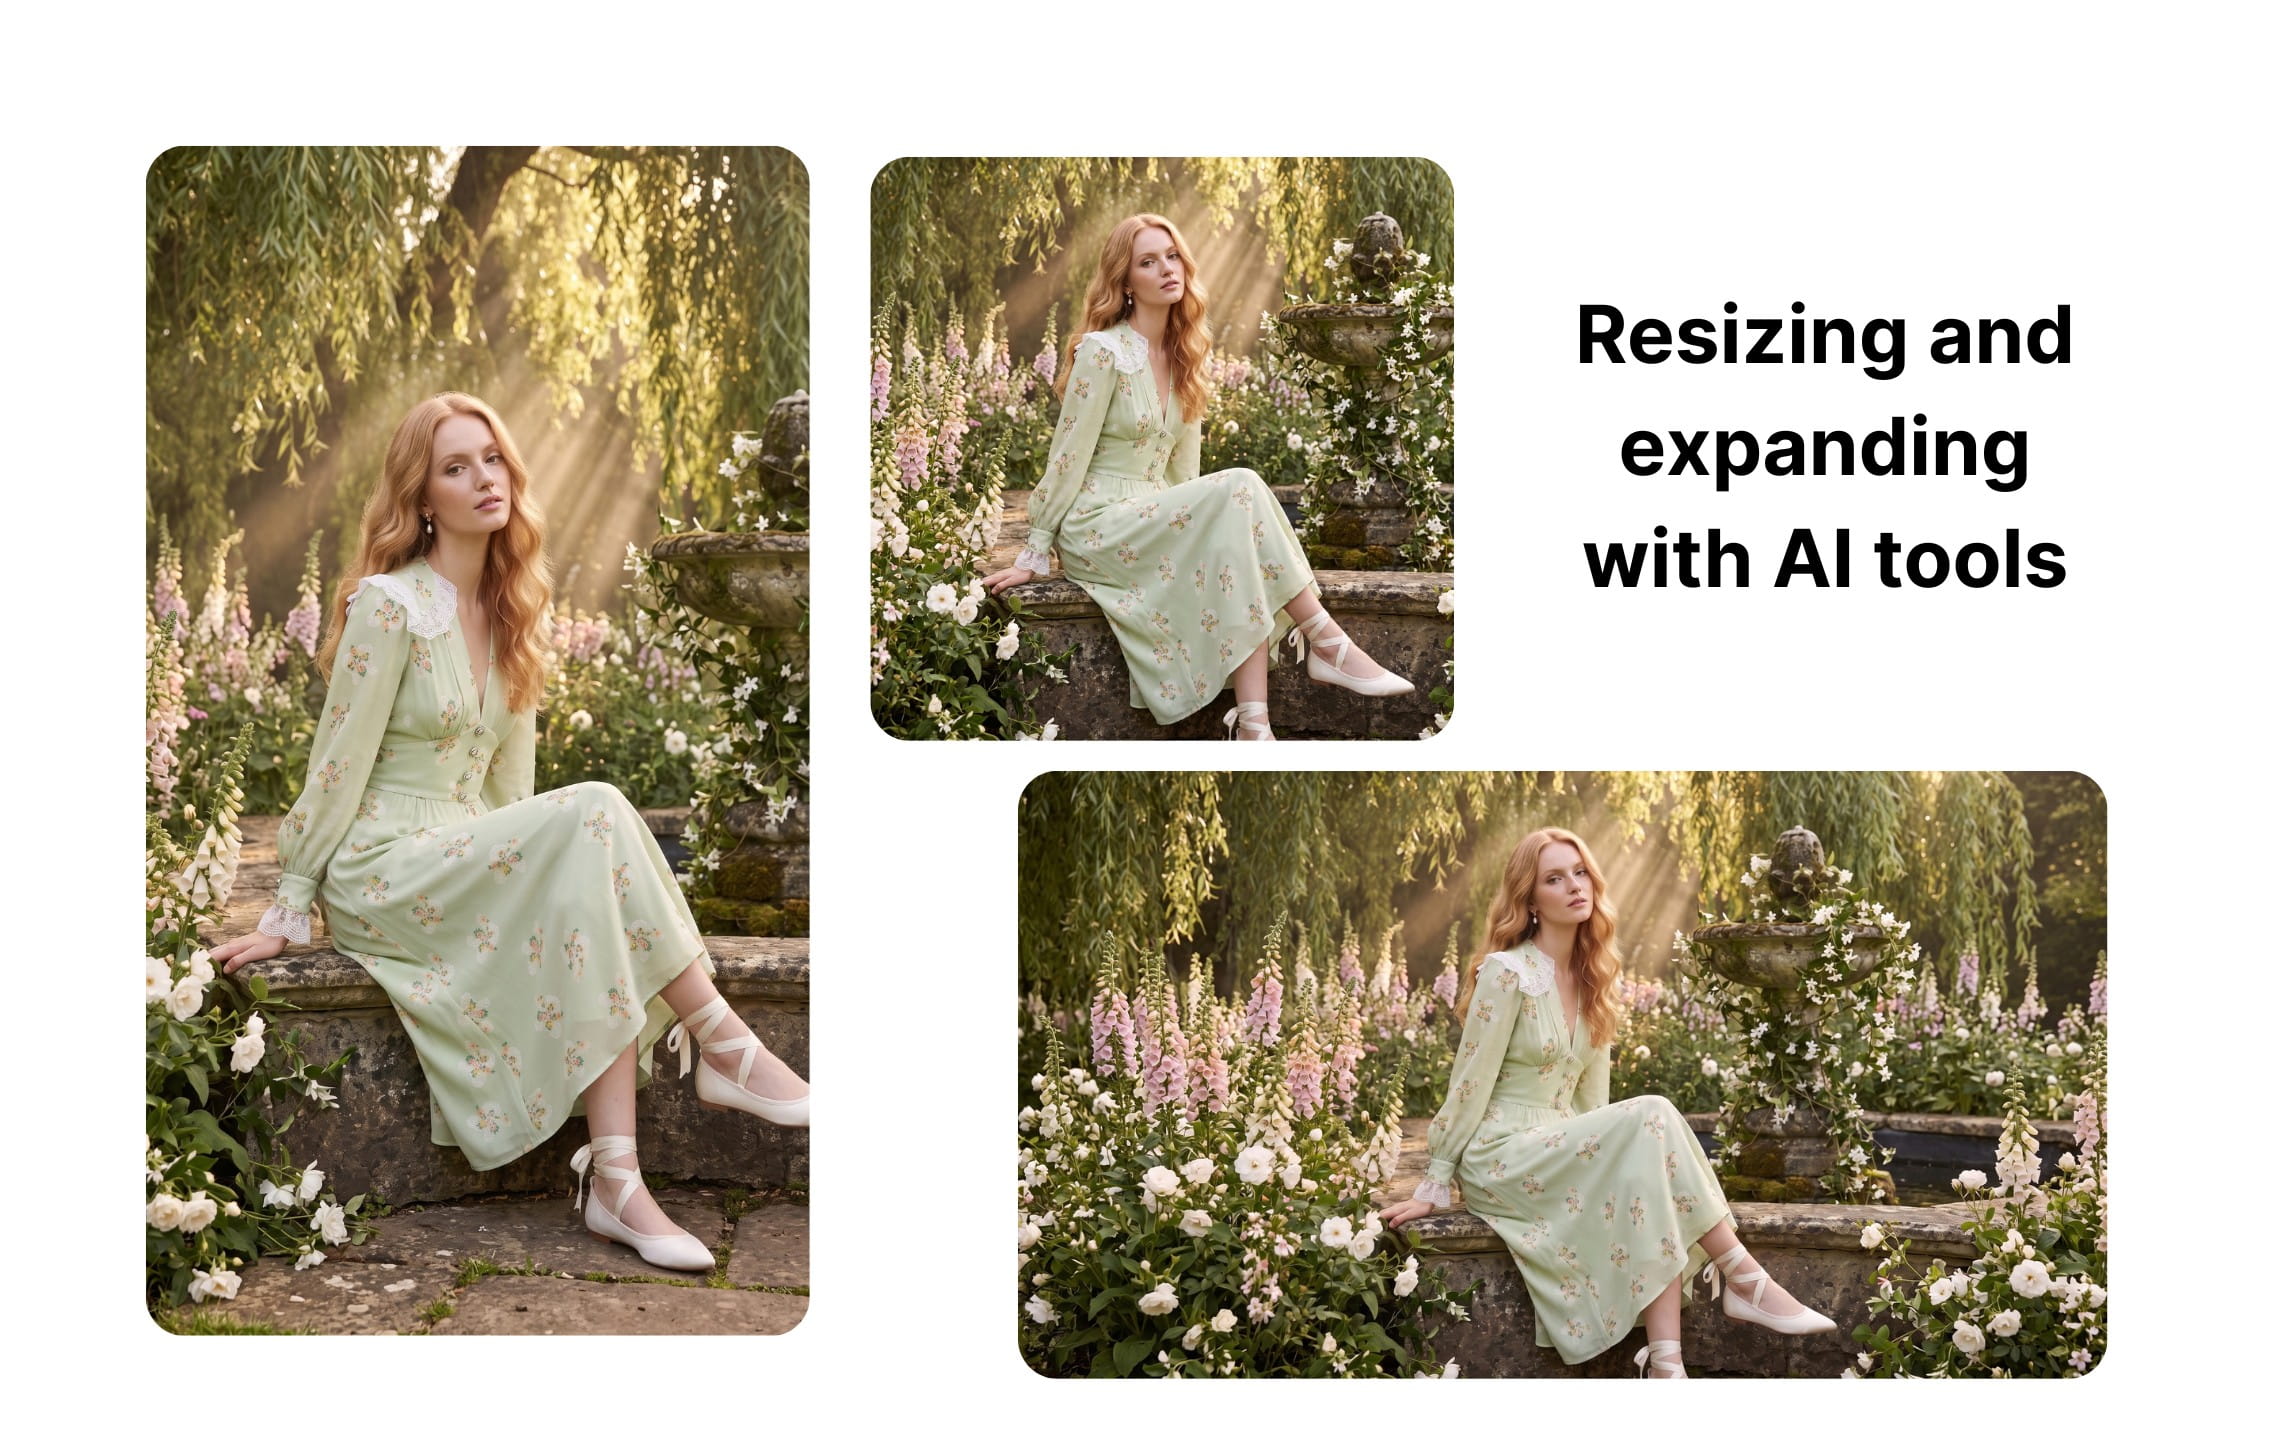
With AI: Smart-crop tools can detect the garment, center it, and create several marketplace or social media formats at once. AI image expansion can add background around a product when you need a wider or taller canvas, while upscaling can make a file large enough for a new placement.
7. Check the full product gallery together
Review the exported images as a set, not just one at a time. The product should not jump in size or position as a shopper moves through the gallery. Background color, white balance, contrast, and shadows should feel consistent.
Common clothing photography mistakes
Here are the major mistakes to avoid:
- Mixed lighting. Window light plus warm room lights can create blue and orange areas in the same garment. Turn off competing lights and use one consistent source.
- Distorted proportions. Wide lenses and tilted cameras can stretch sleeves, shorten bodies, and make hems uneven. Move the camera back, use a standard focal length, and keep it parallel to the garment.
- Pure white with no texture. Increasing exposure until the background clips can also erase detail from pale garments. Light the background and product separately when necessary, or finish the background during editing.
- Inconsistent catalog framing. Small differences in camera height and crop become obvious on a category page. Use a tripod, floor marks, and crop templates.
- Too much retouching. Removing real folds, texture, or construction details can make the product look artificial and increase the gap between the image and the item delivered.
- Only showing the front. One polished hero image rarely answers every product question. Add the back, details, and an on-model view when fit matters.
How to use AI for apparel photography
AI is most useful when it extends a solid source photo. Start with a clean, well-lit image that shows the complete garment. The clearer the input, the less the system has to guess.
Turn a flatlay into on-model photos
You can upload a flatlay or ghost mannequin image, choose a model and pose, and generate on-model variations without organizing a new shoot. This works well for expanding product galleries, testing model representation, or giving shoppers a clearer sense of fit.
Claid’s AI fashion suite lets you work from one garment or a full outfit, choose from 100+ models, use preset poses, and guide the background, lighting, camera angle, pose, and fit with a prompt. If you have the rights and consent to use a real model's image, you can also upload your own.
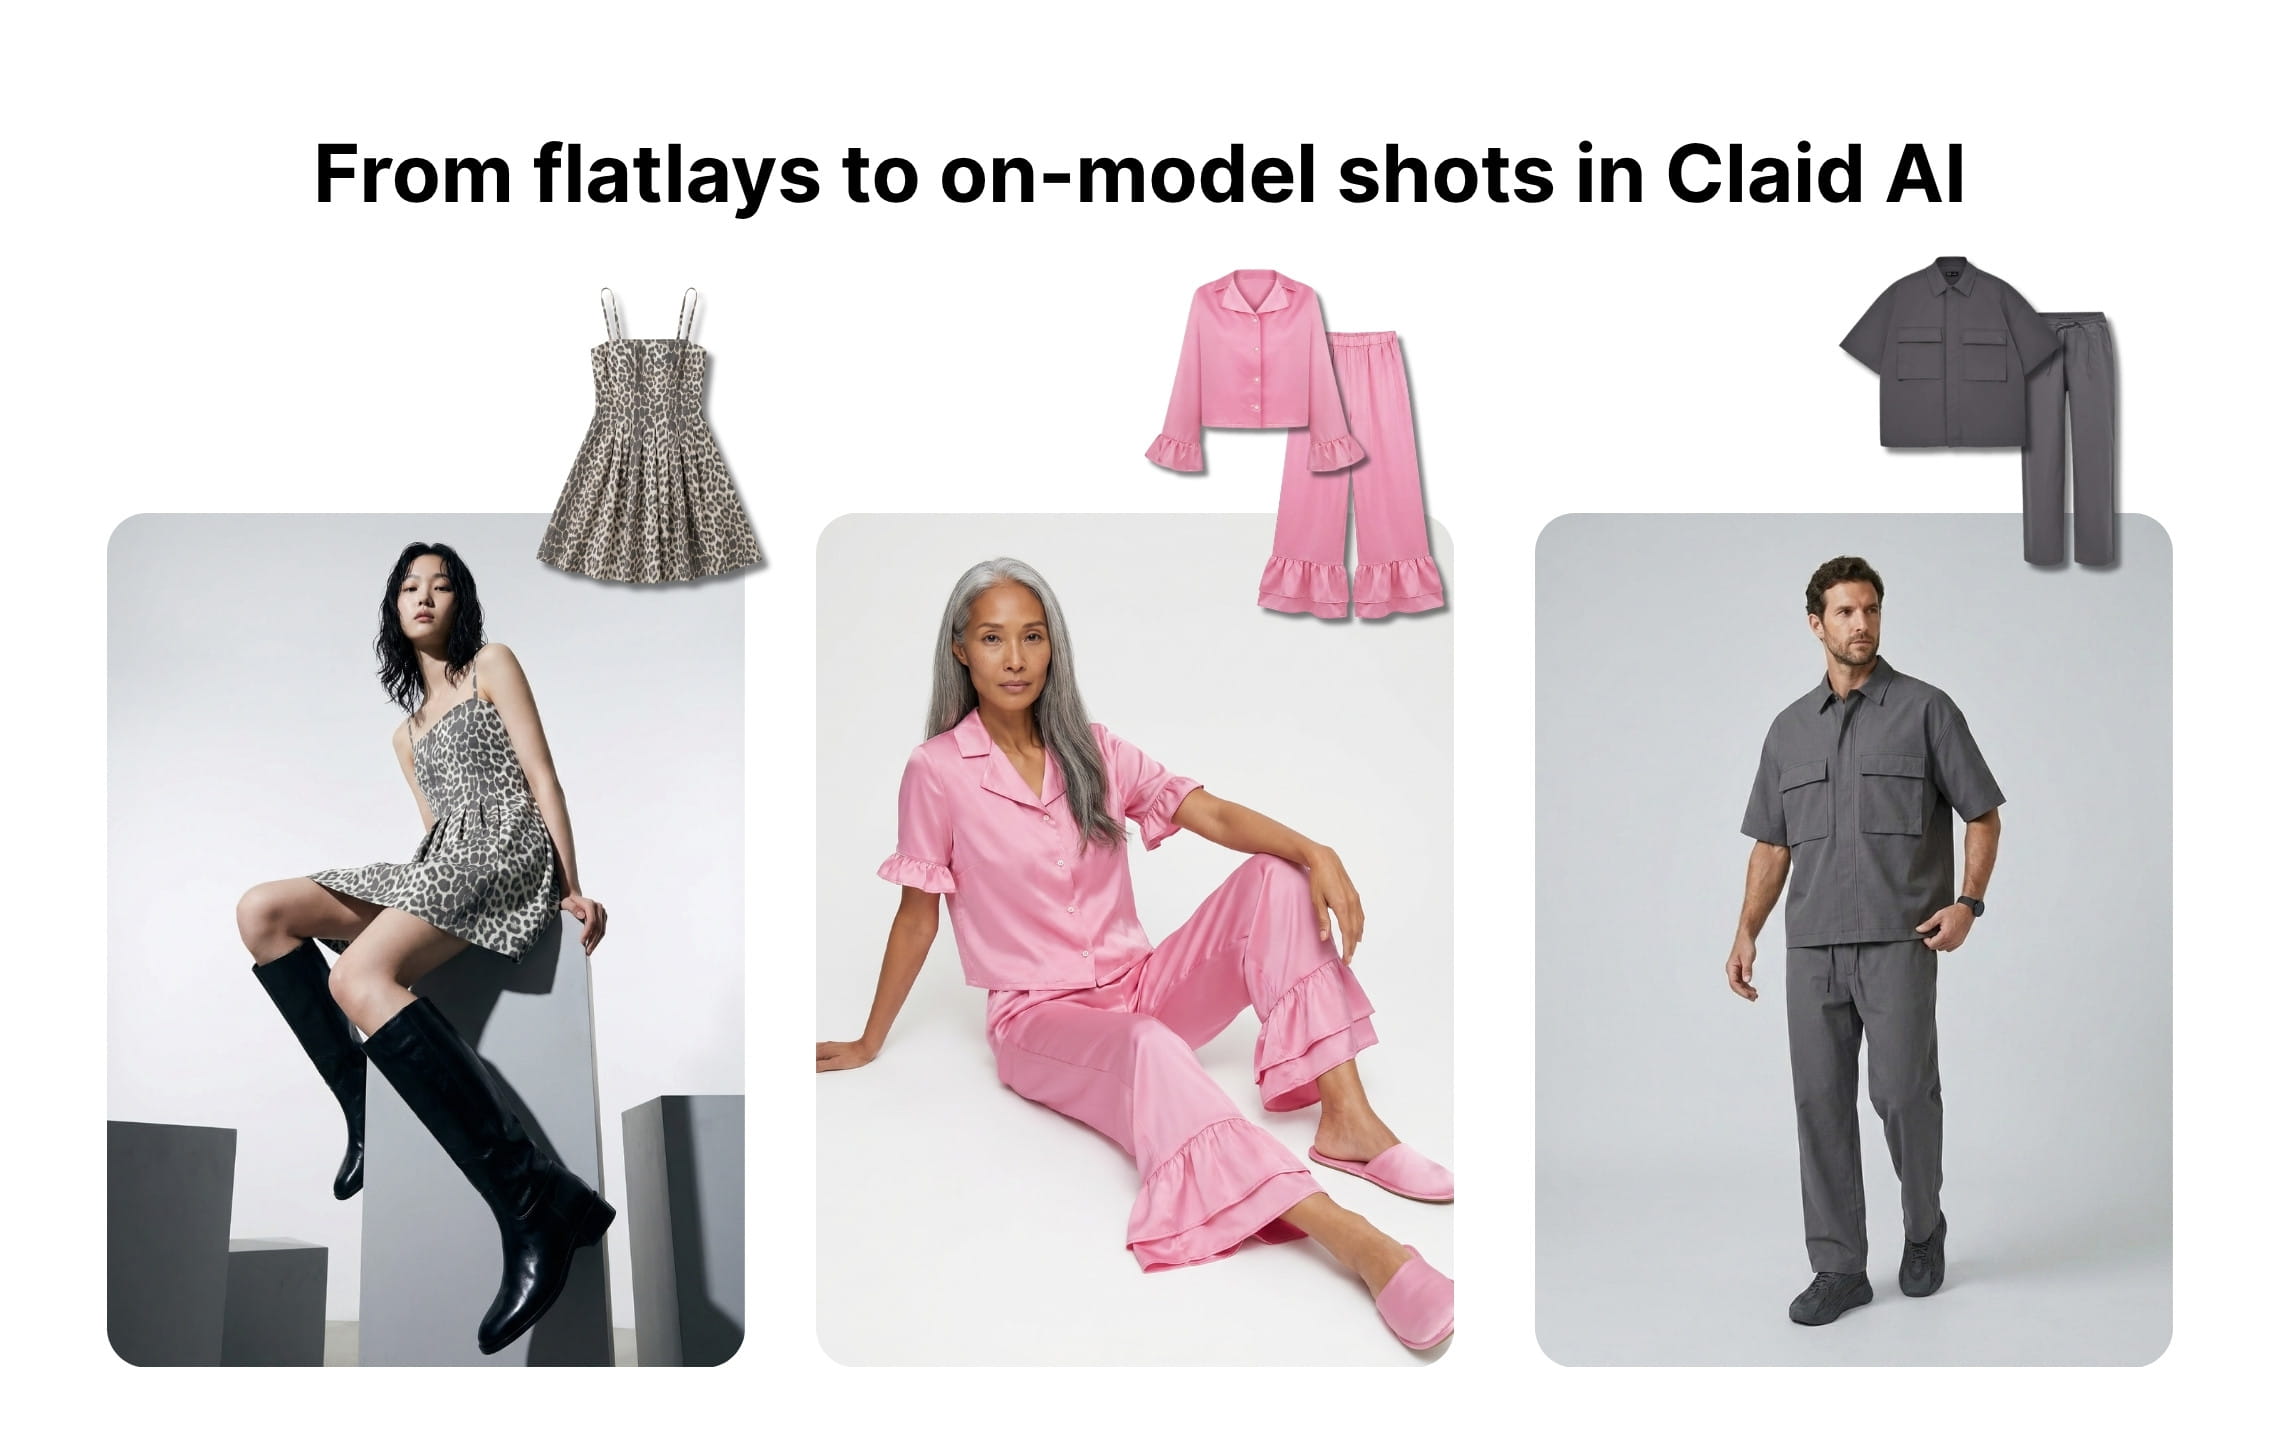
For stronger source images:
- Use a flatlay or ghost mannequin photo on a plain or transparent background
- Show the whole garment so its length and silhouette are clear
- Upload front and back views when both matter
- Remove unrelated accessories and styling pieces
- Avoid sending too many reference images at once
- Check small but important details in every output, including prints, logos, closures, trims, and hems
Generate consistent studio variations
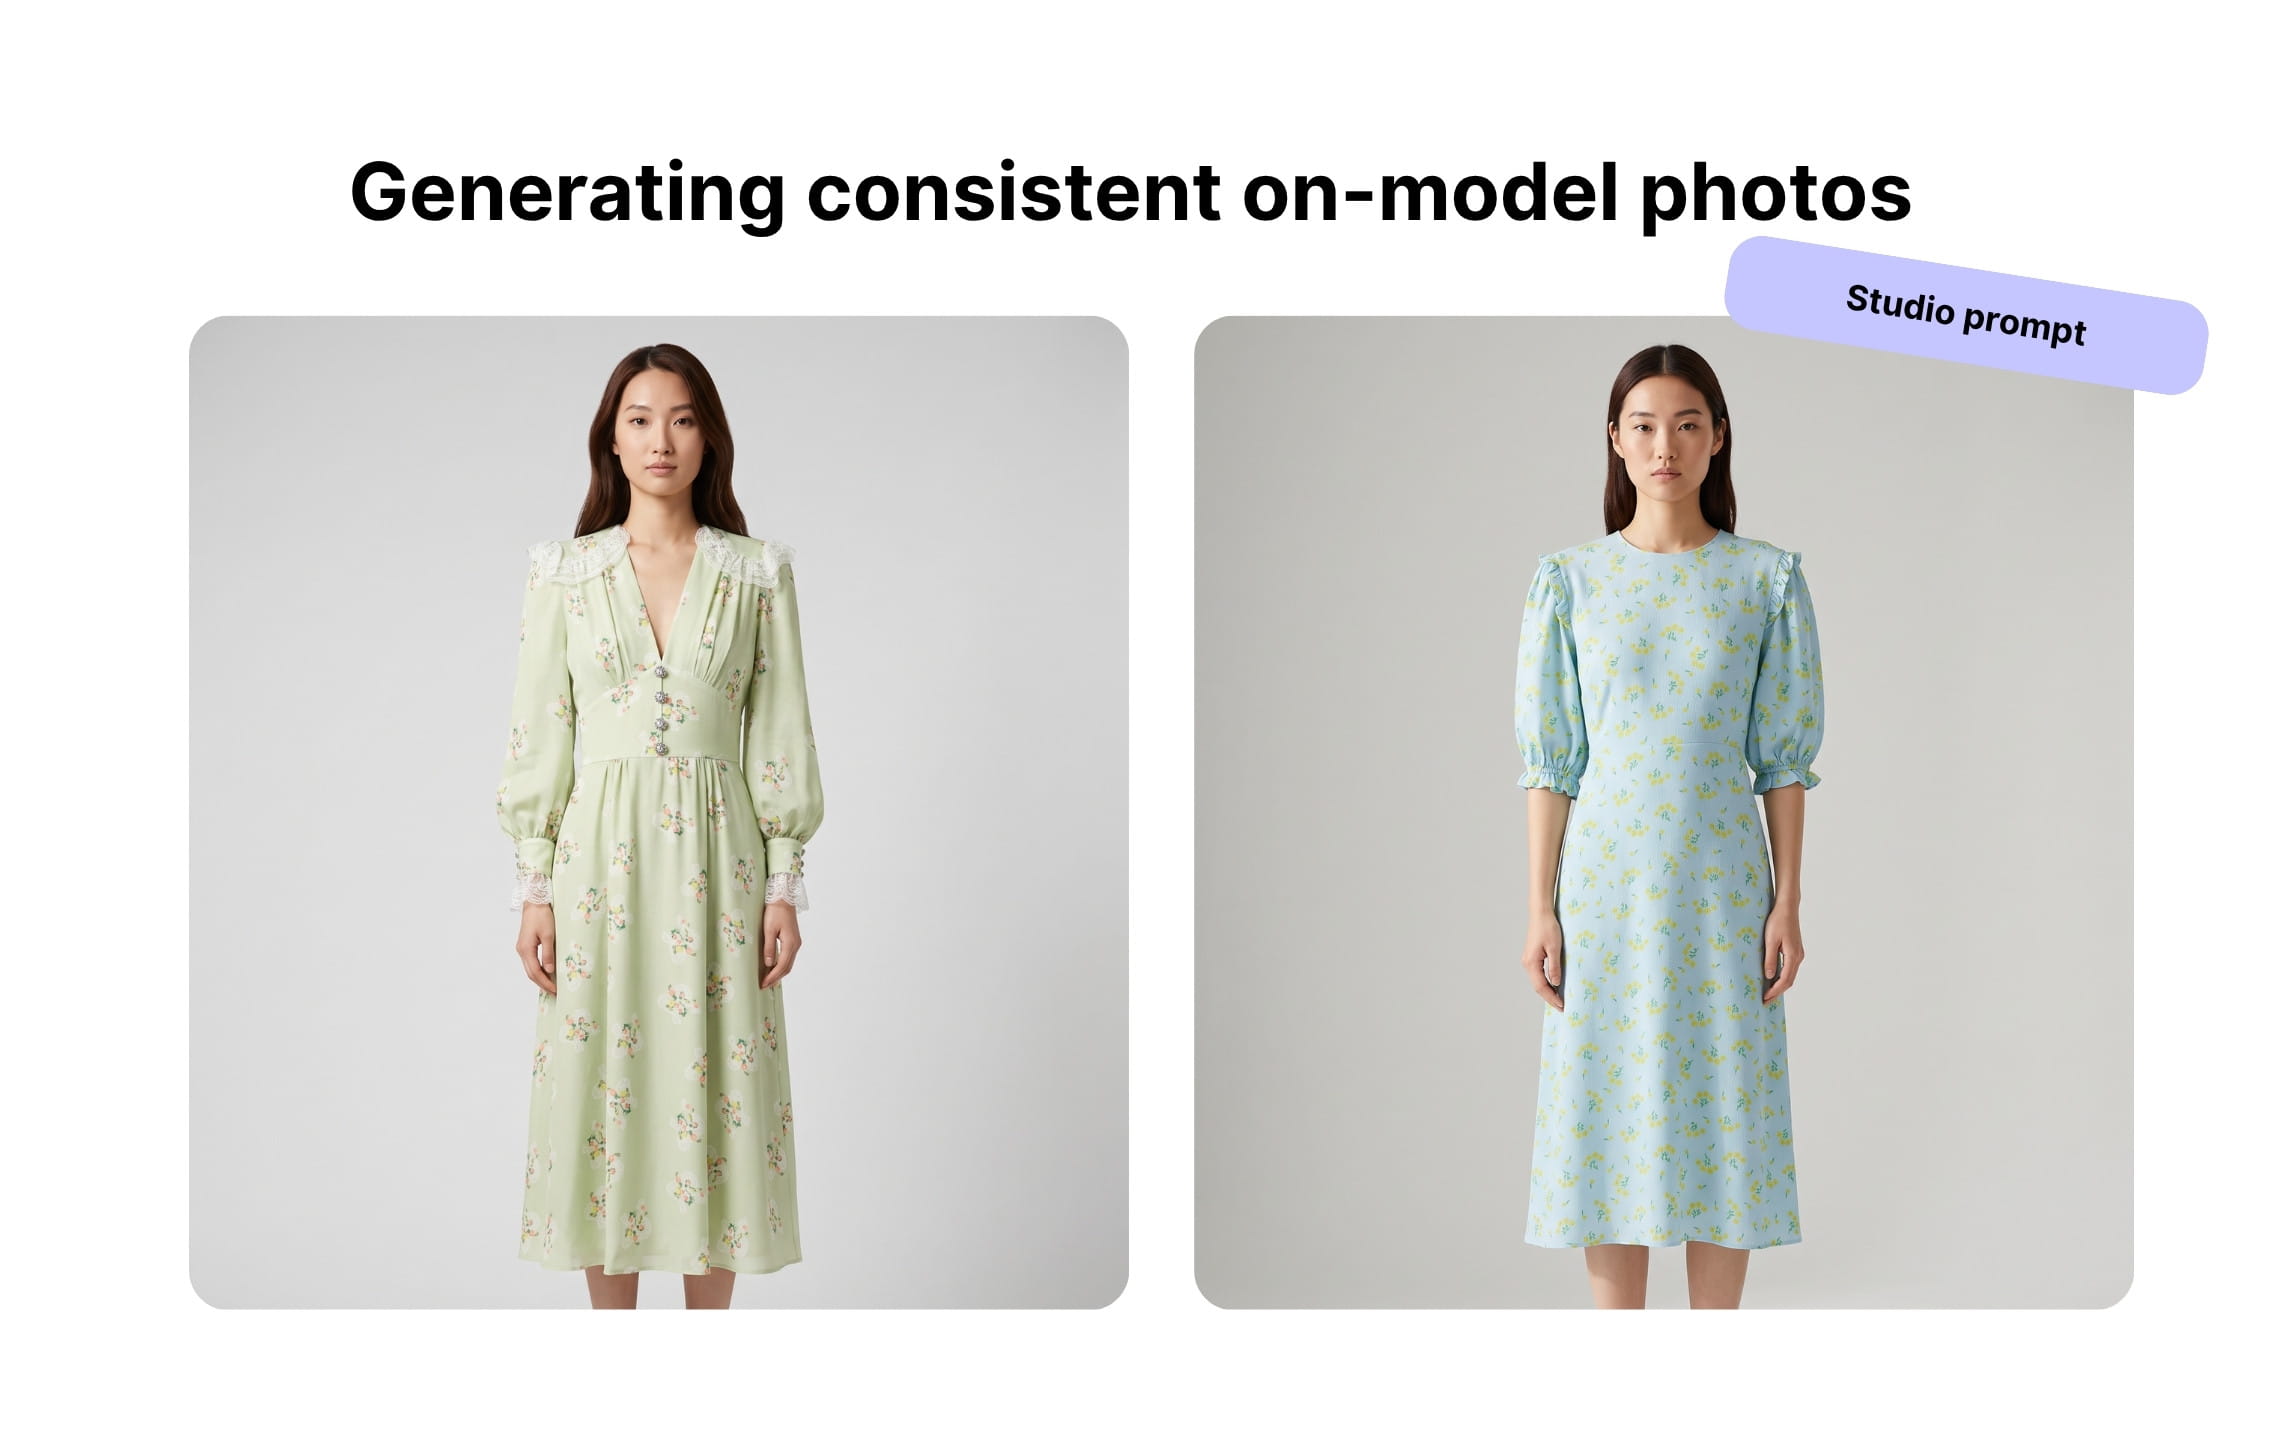
If you need clean product detail page images, keep the prompt simple. Specify the type of studio background, camera framing, lighting direction, and pose. Reuse the same instruction structure across a category, then review every output against the original garment.
Example prompt:
Full-body ecommerce studio photo. Model standing straight, facing the camera, arms relaxed. Soft diffused light from camera left, light gray seamless background, natural contact shadow, eye-level camera, 70 mm look. Preserve the garment's exact color, print, neckline, sleeve length, hem length, and fit.
Create lifestyle and campaign images
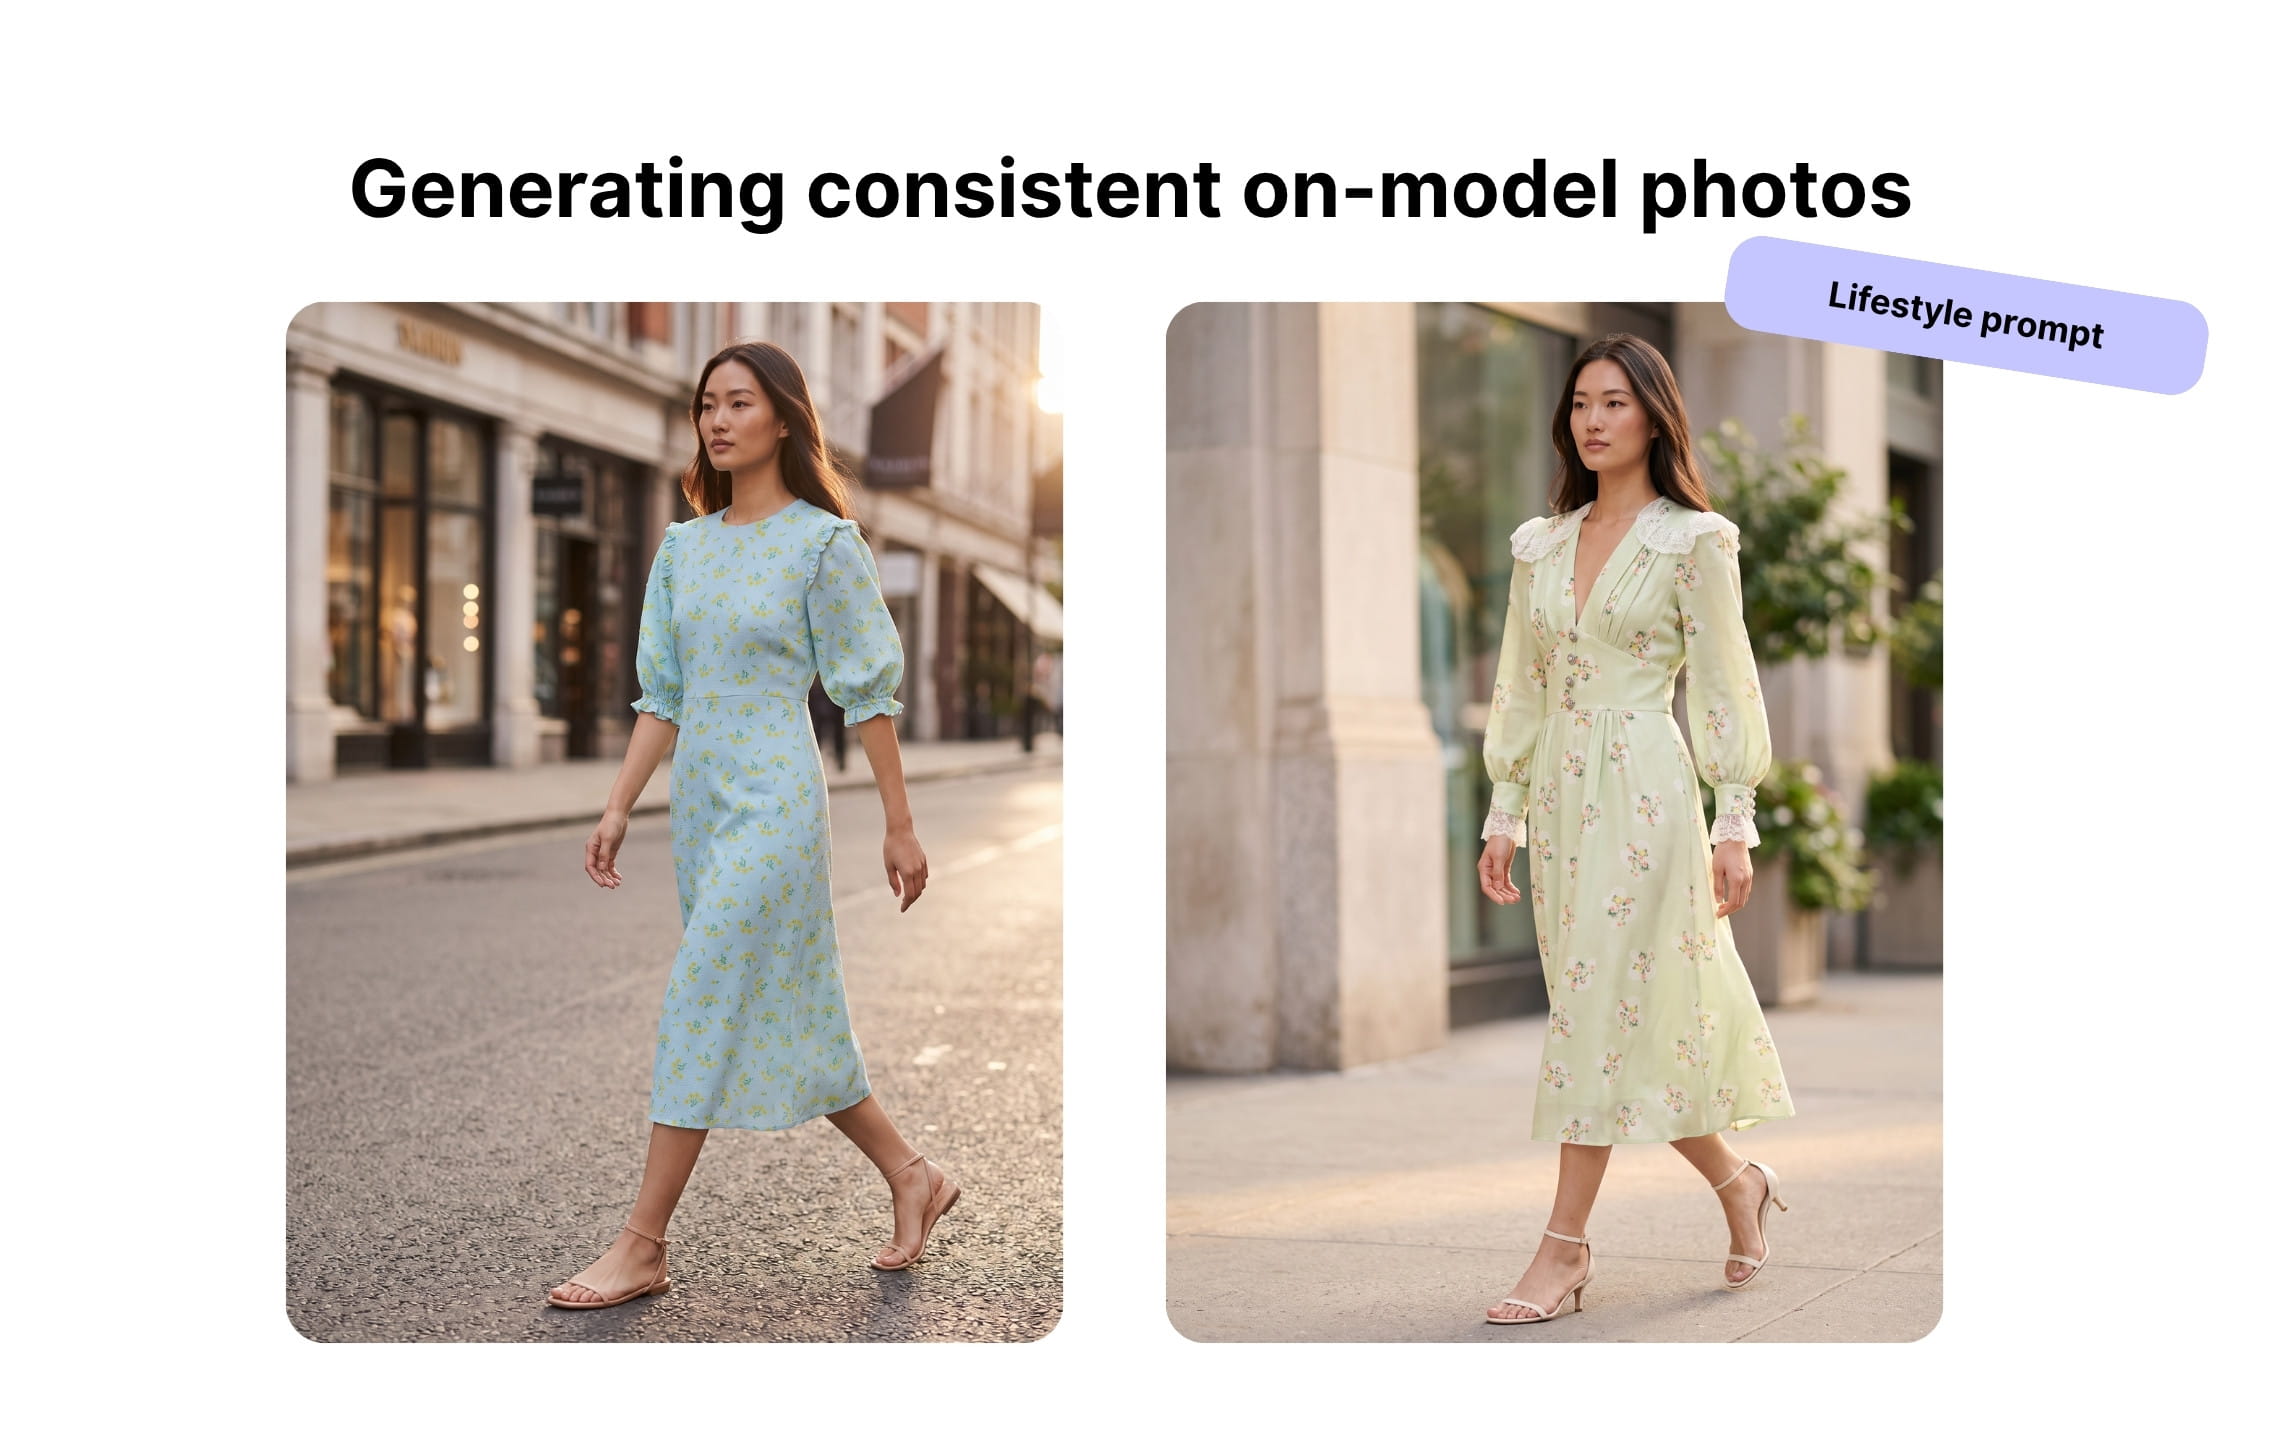
Once the core catalog views are approved, use AI to test settings, styling directions, and formats for ads or social media. Be specific about the scene, lighting, model action, lens feel, and space needed for copy.
Treat these images differently from documentary product views. A campaign visual can be imaginative, but the garment still needs to remain recognizable and accurate if the image is used to sell the item.
Example prompt:
Lifestyle ecommerce photo, outdoor city street at golden hour. Model walking naturally, three-quarter angle, soft motion in the fabric. Warm natural light from camera right, shallow depth of field. Leave negative space on the left third for campaign copy. Preserve the garment's exact color, print, and fit.
Improve and reformat existing images
AI tools can also handle repetitive post-production tasks such as:
- Removing backgrounds
- Extending a canvas to a new aspect ratio
- Improving resolution for larger placements
- Creating a consistent setting across a product group
- Turning approved fashion images into short video assets
Keep an untouched master and compare AI-edited results with the original before publishing.
DIY tool or apparel photography service?
Self-serve software is a good fit when your team has clean source images, a clear visual standard, and time to review outputs. Start with Claid’s AI fashion suite if you want to create on-model shots yourself and iterate on models, poses, backgrounds, and styling.
Apparel photography services make more sense when the work goes beyond generating individual images. You may need a custom process if you need thousands of SKUs, strict output specifications, multiple views per product, or other brand requirements.
For those projects, Claid’s AI fashion production service pairs you with a dedicated creative team that builds and runs a visual content pipeline around your requirements. That can include spec-driven outputs, catalog analysis, on-model imagery, quality checks, and other operations that extend beyond the self-serve product.
Build a process you can repeat
Strong fashion product photography doesn't start with a complicated studio. It starts with a controlled setup, complete shot list, accurate color, and the discipline to repeat the same process across every product.
Shoot the garment clearly first. Edit for accuracy before style. Then use AI where it saves real work: creating on-model views, adapting formats, testing campaign ideas, or scaling an approved look across a catalog.
Don’t want to photograph every SKU yourself? Upload one flatlay or ghost-mannequin shot to Claid’s AI fashion suite to generate on-model and lifestyle images in minutes, or talk to our team about a managed production service if you need this running across an entire catalog.
FAQ
What is the best setup for clothing photography at home?
Use a camera or recent phone on a tripod, one large diffused light or indirect window light, a white foam-board reflector, and a clean matte background. Add a steamer, lint roller, clips, and gray card. Keep the camera position and lighting fixed while you work through the products.
Is flatlay or on-model photography better for clothing?
They answer different questions. Flatlays show the garment clearly and are fast to produce. On-model photos show fit, proportion, and styling. A strong ecommerce gallery often uses both.
Can AI replace a clothing photoshoot?
AI can cover many repeatable catalog, on-model, localization, and campaign-variation needs when it starts from accurate product images. Traditional shoots still make sense for brand-defining campaigns, complex movement, and moments where art direction depends on a real location, cast, or interaction. Many brands use both: shoot the essential source material, then use AI to scale the rest.
Does AI clothing photography cost less than a traditional photoshoot?
Usually, yes, especially at catalog scale. A traditional on-model shoot means booking a photographer, model, and studio for every SKU or variant. AI-generated on-model and lifestyle images start from a single flatlay or ghost-mannequin shot, so the marginal cost of an extra pose, background, or market variation is a fraction of a reshoot. Traditional shoots still make sense for brand campaigns where a specific location, cast, or human performance matters. Check out our product photography cost comparison.
What should I look for in apparel photography services?
Ask how the service handles color accuracy, garment-detail preservation, output consistency, file specifications, quality review, and large catalogs. Also confirm whether it only delivers individual images or can build a repeatable workflow around your products and creative standards.
Need AI fashion photography at scale?
Produce high volumes of on-model and product visuals without slowing down launches. Use our API to automate fashion image workflows or work with our team on a custom pipeline tailored to your operations.


Claid.ai
October 5, 2026