Tech
Beautiful interiors and realistic AI furniture product images in AI Photoshoot
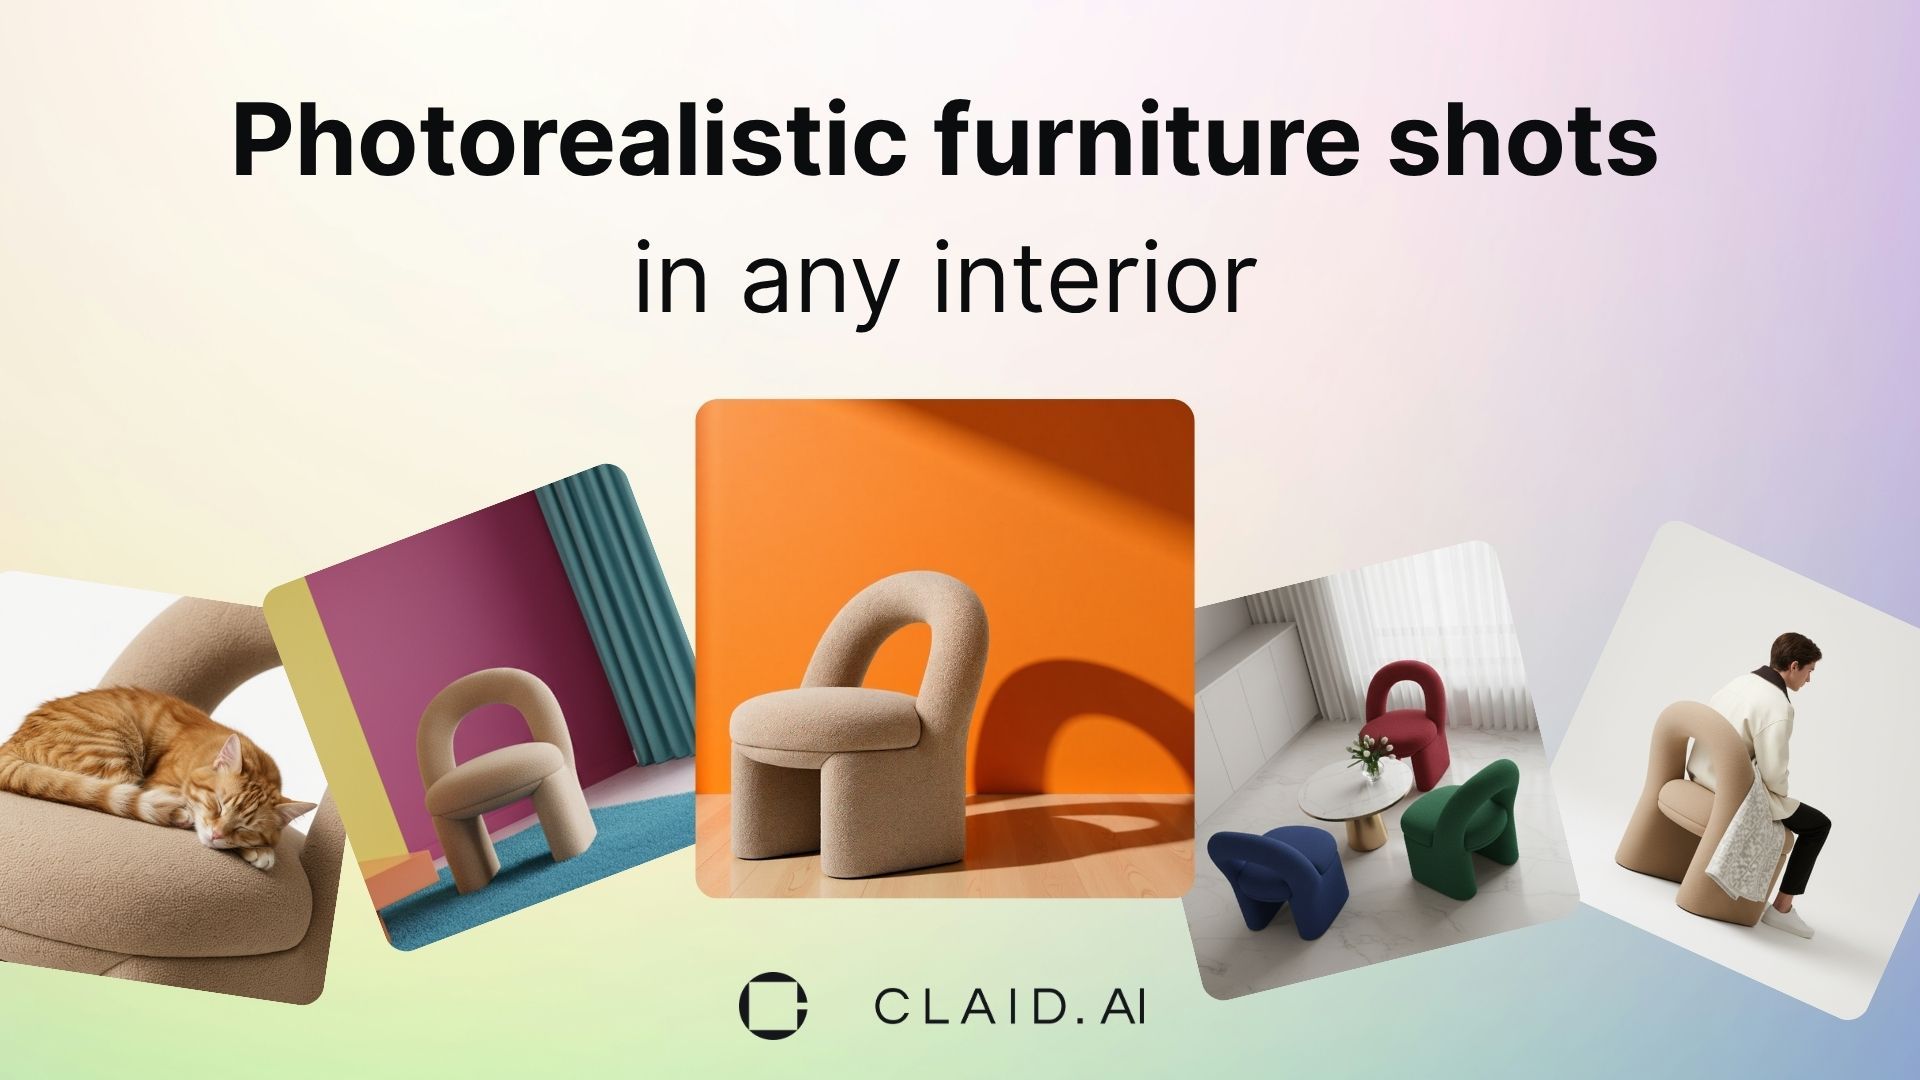
People buy furniture when they can picture it in a real room. With AI furniture placement, you show each piece inside a believable interior and you’ll lift add-to-cart rates and improve marketplace performance. Consistent, high-quality visuals are now a core growth lever, not a nice-to-have.
With our latest AI Photoshoot update, you can experiment with endless campaigns and produce full room sets from a single product image. In this guide for AI furniture photos, we’ll go through the steps you need to take to create beautiful interiors for your products in seconds.
Why high-quality furniture photos are crucial for ecommerce success
Customers expect visuals that feel authentic, help them judge scale, and inspire confidence that the piece will fit their lifestyle.
Here’s why your visuals matter more than ever in 2025:
- Helping customers understand scale. Numbers on a spec sheet don’t tell the full story. When buyers see your product placed in a realistic interior, they can immediately sense proportions—how a dining table relates to chairs, or how a sideboard looks next to a window. AI Photoshoot now makes it effortless to create these context-rich settings in seconds.
- Reducing costly returns and customer hesitation. Furniture returns are painful, and a big driver of returns is “it looked different online.” By showing your product in multiple real-life scenarios, you set accurate expectations and reduce return rates.
- Getting stronger brand perception through consistency. Marketplace sellers struggle with scattered visuals—some UGC shots, some studio shots, some quick smartphone photos. Consistent, polished imagery across your catalog instantly signals trust and professionalism, helping you stand out from generic sellers.
- Differentiating in saturated markets. Using unique, high-quality AI-generated lifestyle photos lets your products look like they belong in aspirational interiors, not just in a plain white box. This strengthens your positioning against competitors and keeps customers from treating your product as interchangeable.
- Saving time and money. Coordinating a furniture shoot is a major investment: location rental, set design, delivery logistics, lighting, stylists. With AI Photoshoot, you get studio-quality, campaign-ready images for a fraction of the cost—without moving a single chair.
Create gorgeous interiors with AI furniture photography
Let’s go through the process of how you can generate endless furniture product campaigns by using Claid’s AI Photoshoot.
Step 1: Upload the image
Upload a photo of your furniture product to Claid.
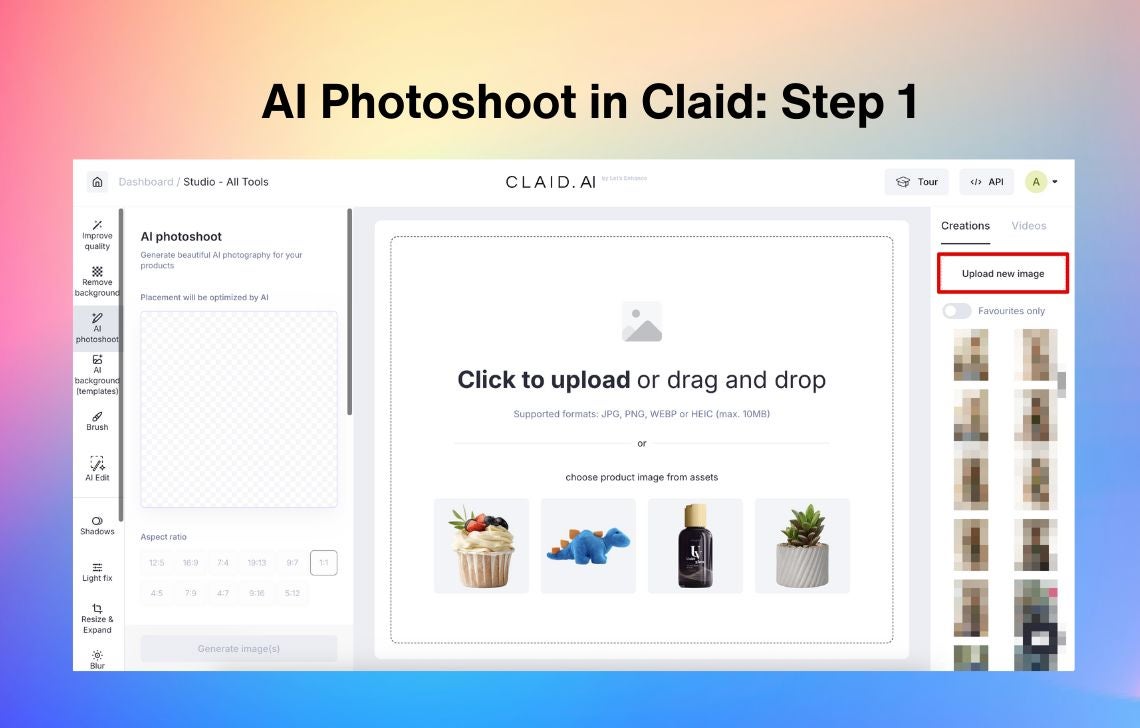
💡Use product images with transparent backgrounds. If you don’t have such images, go to the Remove background feature before using AI Photoshoot.
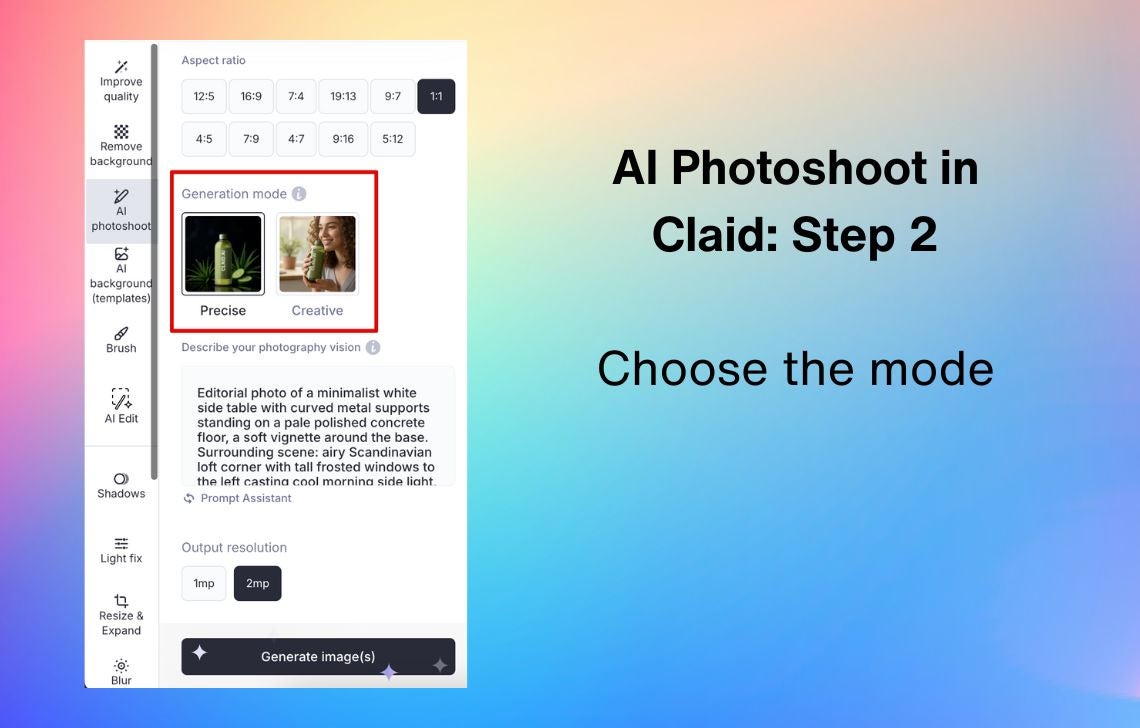
Step 2: Choose a generation mode
In the AI Photoshoot settings, you get 2 options: Precise and Creative generation mode.
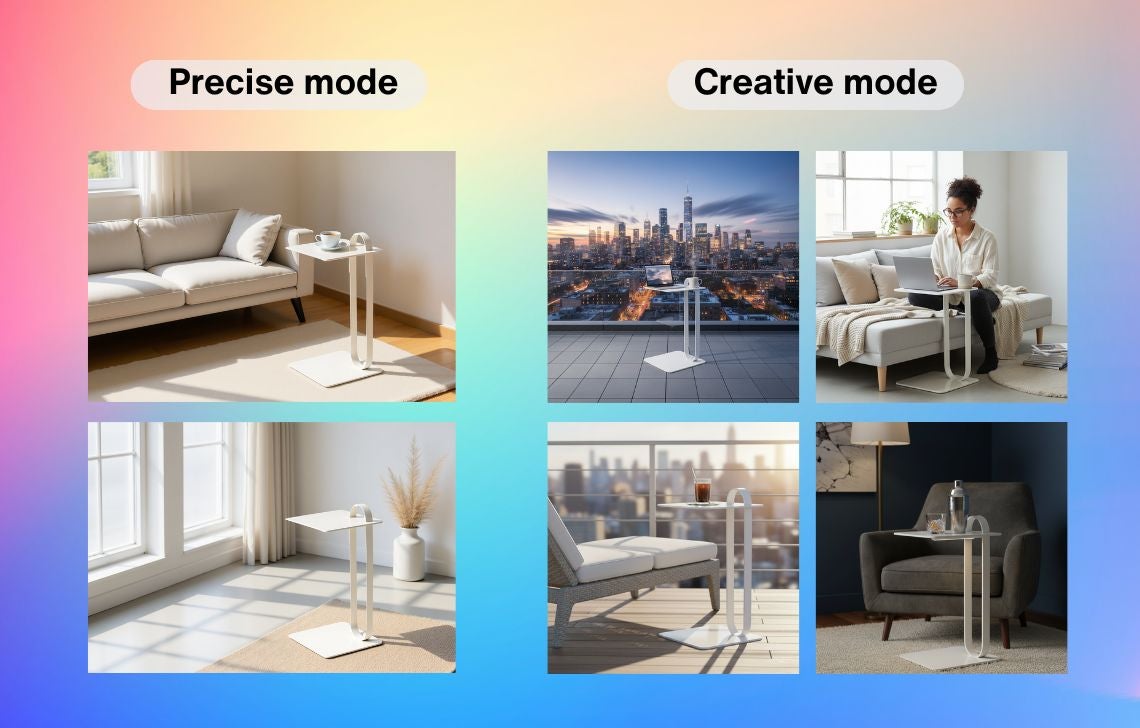
- Precise “locks in” the position and angle of your product and lets you choose the aspect ratio. Choose this mode when you need marketplace-ready images that meet platform requirements, or when you want to showcase the exact placement and proportions of your product (catalog shots, comparison pages, variant listings).
- Creative lets you go as wild as you can and can change the angle of the product according to the prompt. Its key capabilities include shots with people (to show your furniture in real-life contexts) and reference-based generation (to replicate a certain style or idea). Choose this mode when you’re testing ad concepts, building lifestyle campaigns, or exploring unique settings that show your furniture in aspirational interiors and unexpected angles.
Step 3: Position your product (Precise mode only)
In the Precise mode, AI furniture visualization lets you choose the aspect ratio and adjust the product image to fit onto the canvas the way you like.
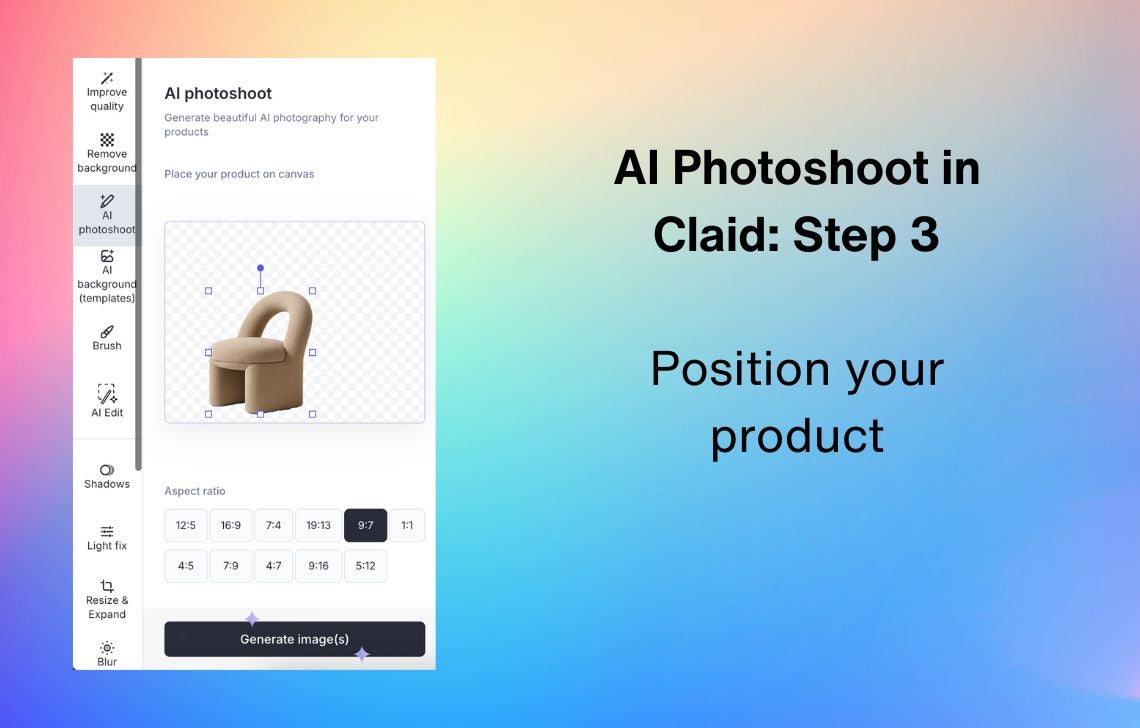
This will help you demonstrate your product from close-up to showcase details such as fabric texture, stitching, or hardware finishes. You can also zoom out to create a balanced full-room shot, making it easier for buyers to understand proportions without distorting the product.
Step 4: Write a furniture photography prompt
This is where you tell the AI exactly what kind of image you want. The more context you provide, the more realistic and on-brand your results will be. Think of your prompt as giving directions to a professional photographer and set designer rolled into one.
💡Use Prompt Assistant that will turn a rough idea into a full-fledged prompt.
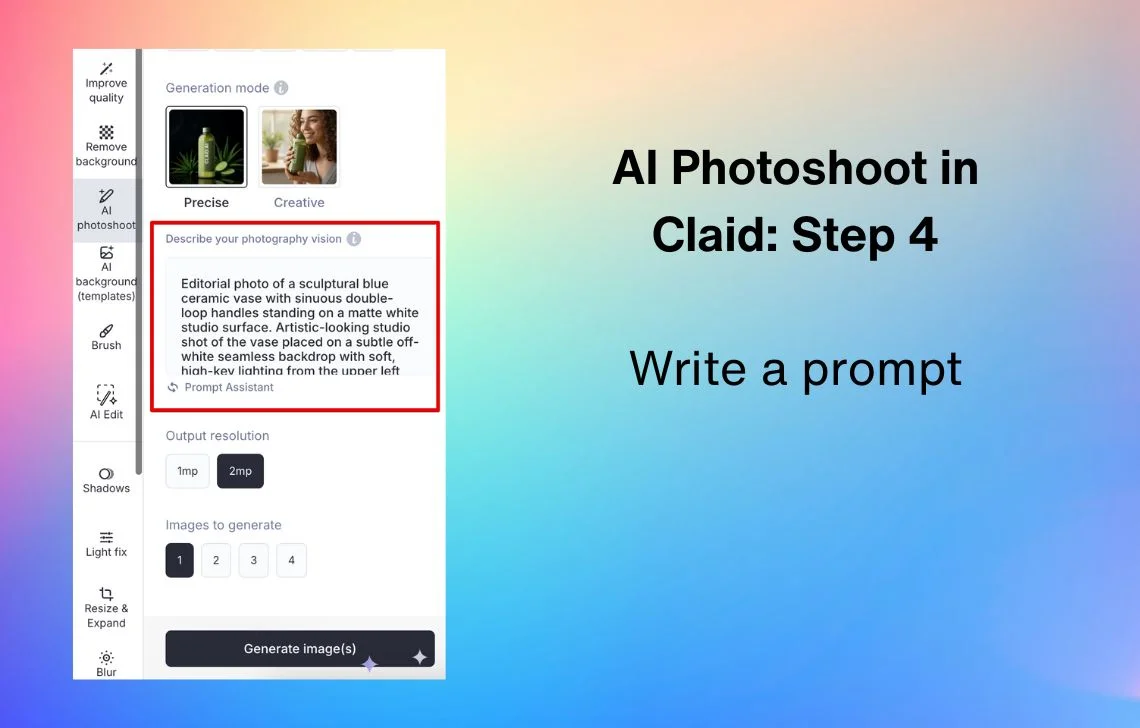
Elements to include in your furniture visualization prompt:
- Interior design style. Define the look you’re going for: modern loft, rustic farmhouse, mid-century, Scandinavian minimalism, luxury penthouse. You can even specify famous designers to give an idea of what you envision.
- Background elements. Place your furniture in a believable environment: a park with picnic tables, a café with chairs and windows, a playground with slides, an office lounge with potted plants. Experiment with different ideas to find the perfect background for furniture photography that fits your brand.
- Lighting direction. Specify where light comes from and how it should interact with your furniture: natural sunlight from a window, warm lamp lighting, dramatic spotlight.
- Objects and materials. Describe key props and surfaces to add realism: wooden dining table, marble countertop, exposed brick wall, stone oven, linen curtains.
- Type of photoshoot. Guide the creative feel: professional studio photo, cinematic noir, impressionist art, hyper-realistic catalog shot, soft blur for depth of field.
- Human interaction. If you want to demonstrate your furniture in real use, add people for scale and lifestyle context: a person sitting at the dining table, kids playing on the rug, hands opening a cabinet door, and so on.
- Product size. For more predictable results, you can specify the dimensions of your furniture.
The more descriptive your text input, the better the results.
Use our image prompt best practices to refine your prompts and get consistent, high-quality AI furniture backgrounds.
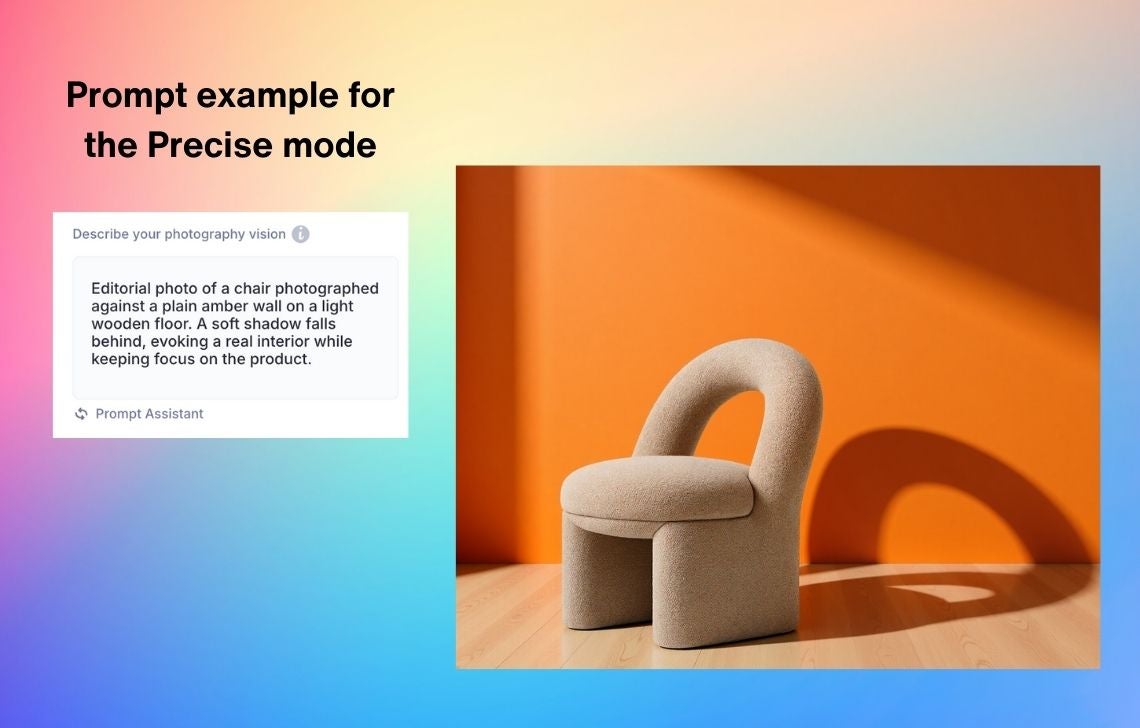
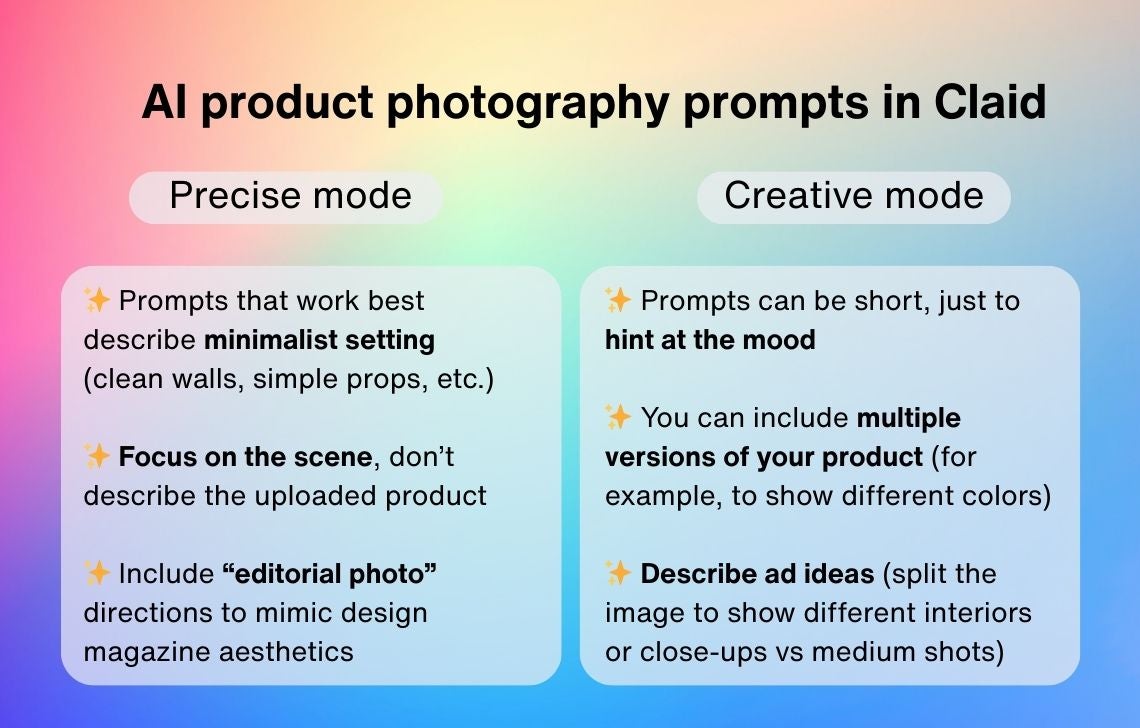
💡In the Precise mode, your prompt should focus on the interior and not on the product itself. Don’t describe your product in detail, as AI is already taking into account your image and exact angle. While in the Creative mode, you can freely change the product itself: turn it in different directions, stack multiple ones on top of each other, change its color, etc.
Here are some of the other key differences in prompt orchestration between our generation modes:
Or use a reference image
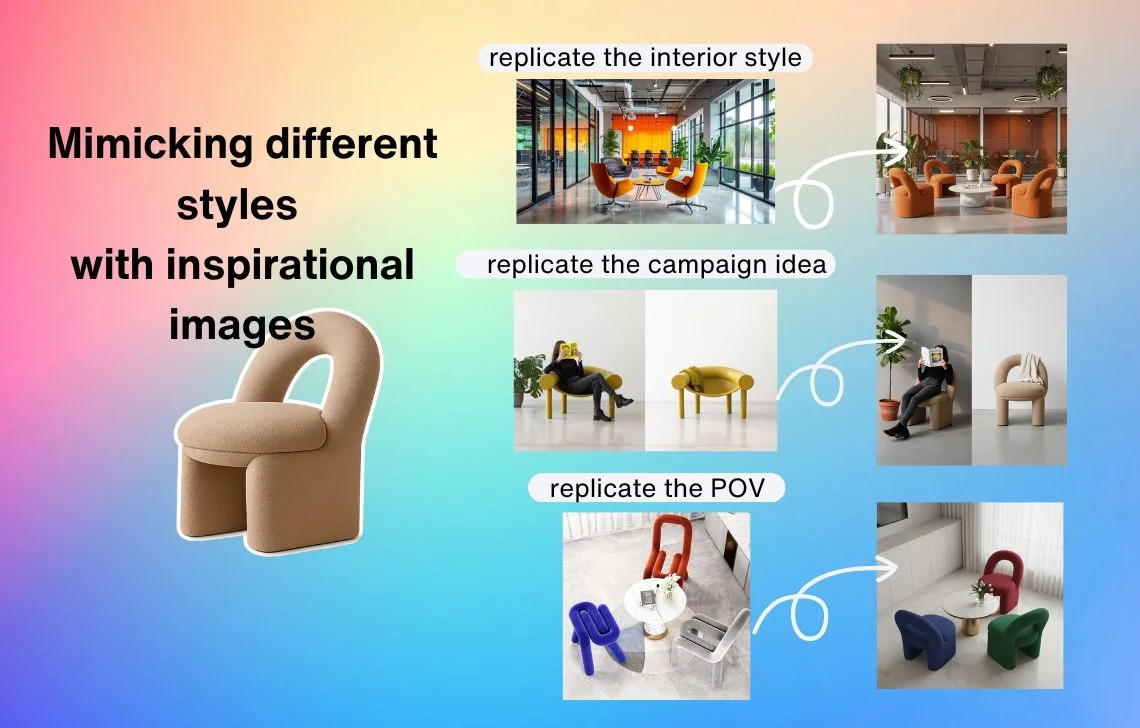
The Creative mode also gives you an option to upload an inspiration picture to guide generation. With a photo that matches the interior style, lighting, or composition you’re aiming for, AI Photoshoot can generate furniture shots with the same atmosphere.
This is especially useful if you want to recreate a past campaign for consistency, match a trending look from social media, or align your visuals with a specific brand aesthetic. With a single reference picture, you can instantly steer the AI toward the exact vibe you need—without relying on trial and error in your prompts.
Step 5: Generate and download
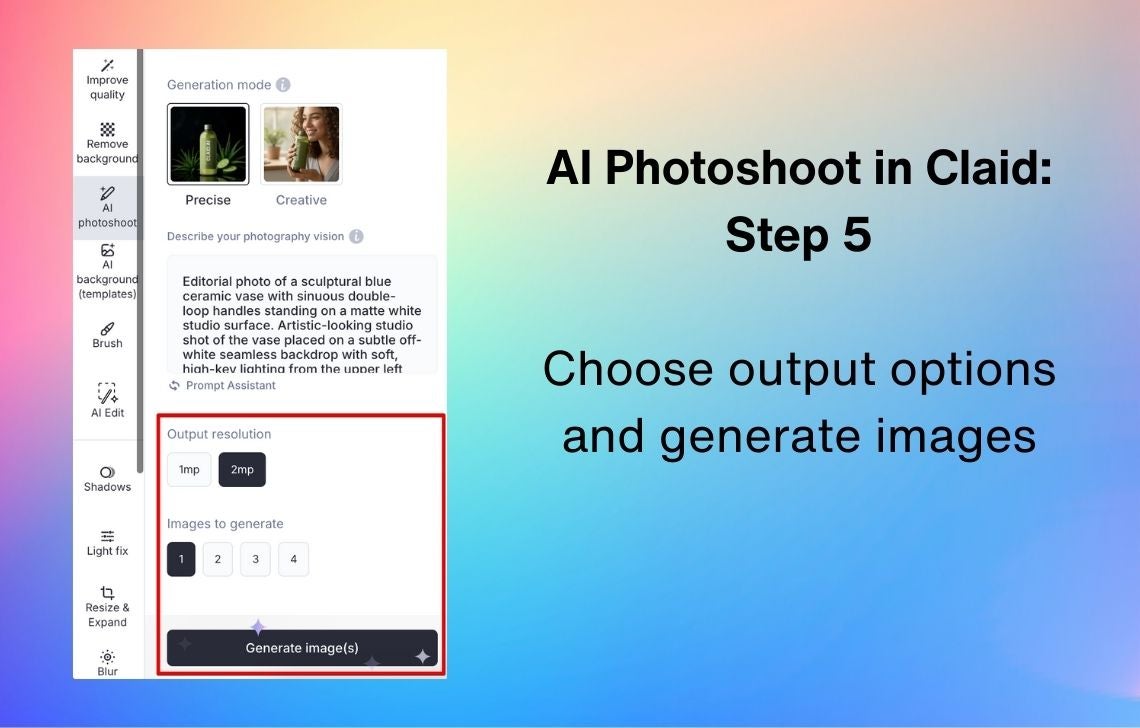
Once you’re happy with the prompt or a reference image, choose the output resolution (available for the Precise mode) and the number of images to generate (note that each image counts to your AI Photoshoot limits). Generate images—and enjoy your professional-looking furniture product photography.
Don’t forget that you can refine the results with the AI Edit feature if you need small changes: adjust the size of props like a coffee cup, or change your product’s color. You can also change the final size with the Resize and Expand tool: it will help you fit creative results into required resolutions for social media or marketplaces.
If the resulting AI furniture placement doesn’t match the mood you need or lacks authenticity, reexamine your prompt and try writing a more detailed one.
Improve your furniture sales with AI Photoshoot
With AI Photoshoot, you can take your furniture marketing to the next level.
- Enjoy lightning-fast rendering that produces detailed interior scenes in seconds—no matter how complex your prompt is.
- Generate endless AI furniture staging variations—from minimalist apartments to luxury homes—without moving a single chair.
- Build consistent, high-quality visuals across your entire catalog, so your brand looks polished on marketplaces and social feeds alike.
- Reduce “looked different in person” returns by showing your furniture in multiple contexts, and run A/B tests on room styles or layouts without reshooting.
Ready to see the difference? Try AI Photoshoot and start creating high-converting furniture images in minutes.

Claid.ai
October 30, 2025