Midjourney product photography: Use AI backgrounds for your products - Claid.ai [2026]

![Picture for Midjourney product photography: Use AI backgrounds for your products - Claid.ai [2026] article](/static/e0779ef4f3f0f6146066f3963372e6a3/ef08a/Midjourney_Claid_5e311b2cac.webp)
Creating professional product photos doesn't always require a physical photoshoot. By combining Midjourney's powerful background generation with Claid.ai's precise product placement, you can produce stunning visuals. This guide will walk you through each step of the process, from writing the perfect Midjourney prompt to fine-tuning your final image in Claid.ai.
Generate a background in Midjourney
The first step is to create a suitable background using Midjourney. The key to success lies in crafting an effective prompt that will generate the ideal setting for your product.
1. Open Discord and navigate to the Midjourney server.
Note: Alternatively, you can use Midjorney's web interface (it is also a more beginner-friendly option)
2. Type /imagine followed by your prompt.
When constructing your prompt, include these essential elements:
- Surface material
- Lighting setup
- Photographic techniques
- Additional descriptors (color, mood, style)
Example prompt: "Polished chrome surface, three-point lighting, macro lens, cool tones, minimalist product photography setup"
Essential rules
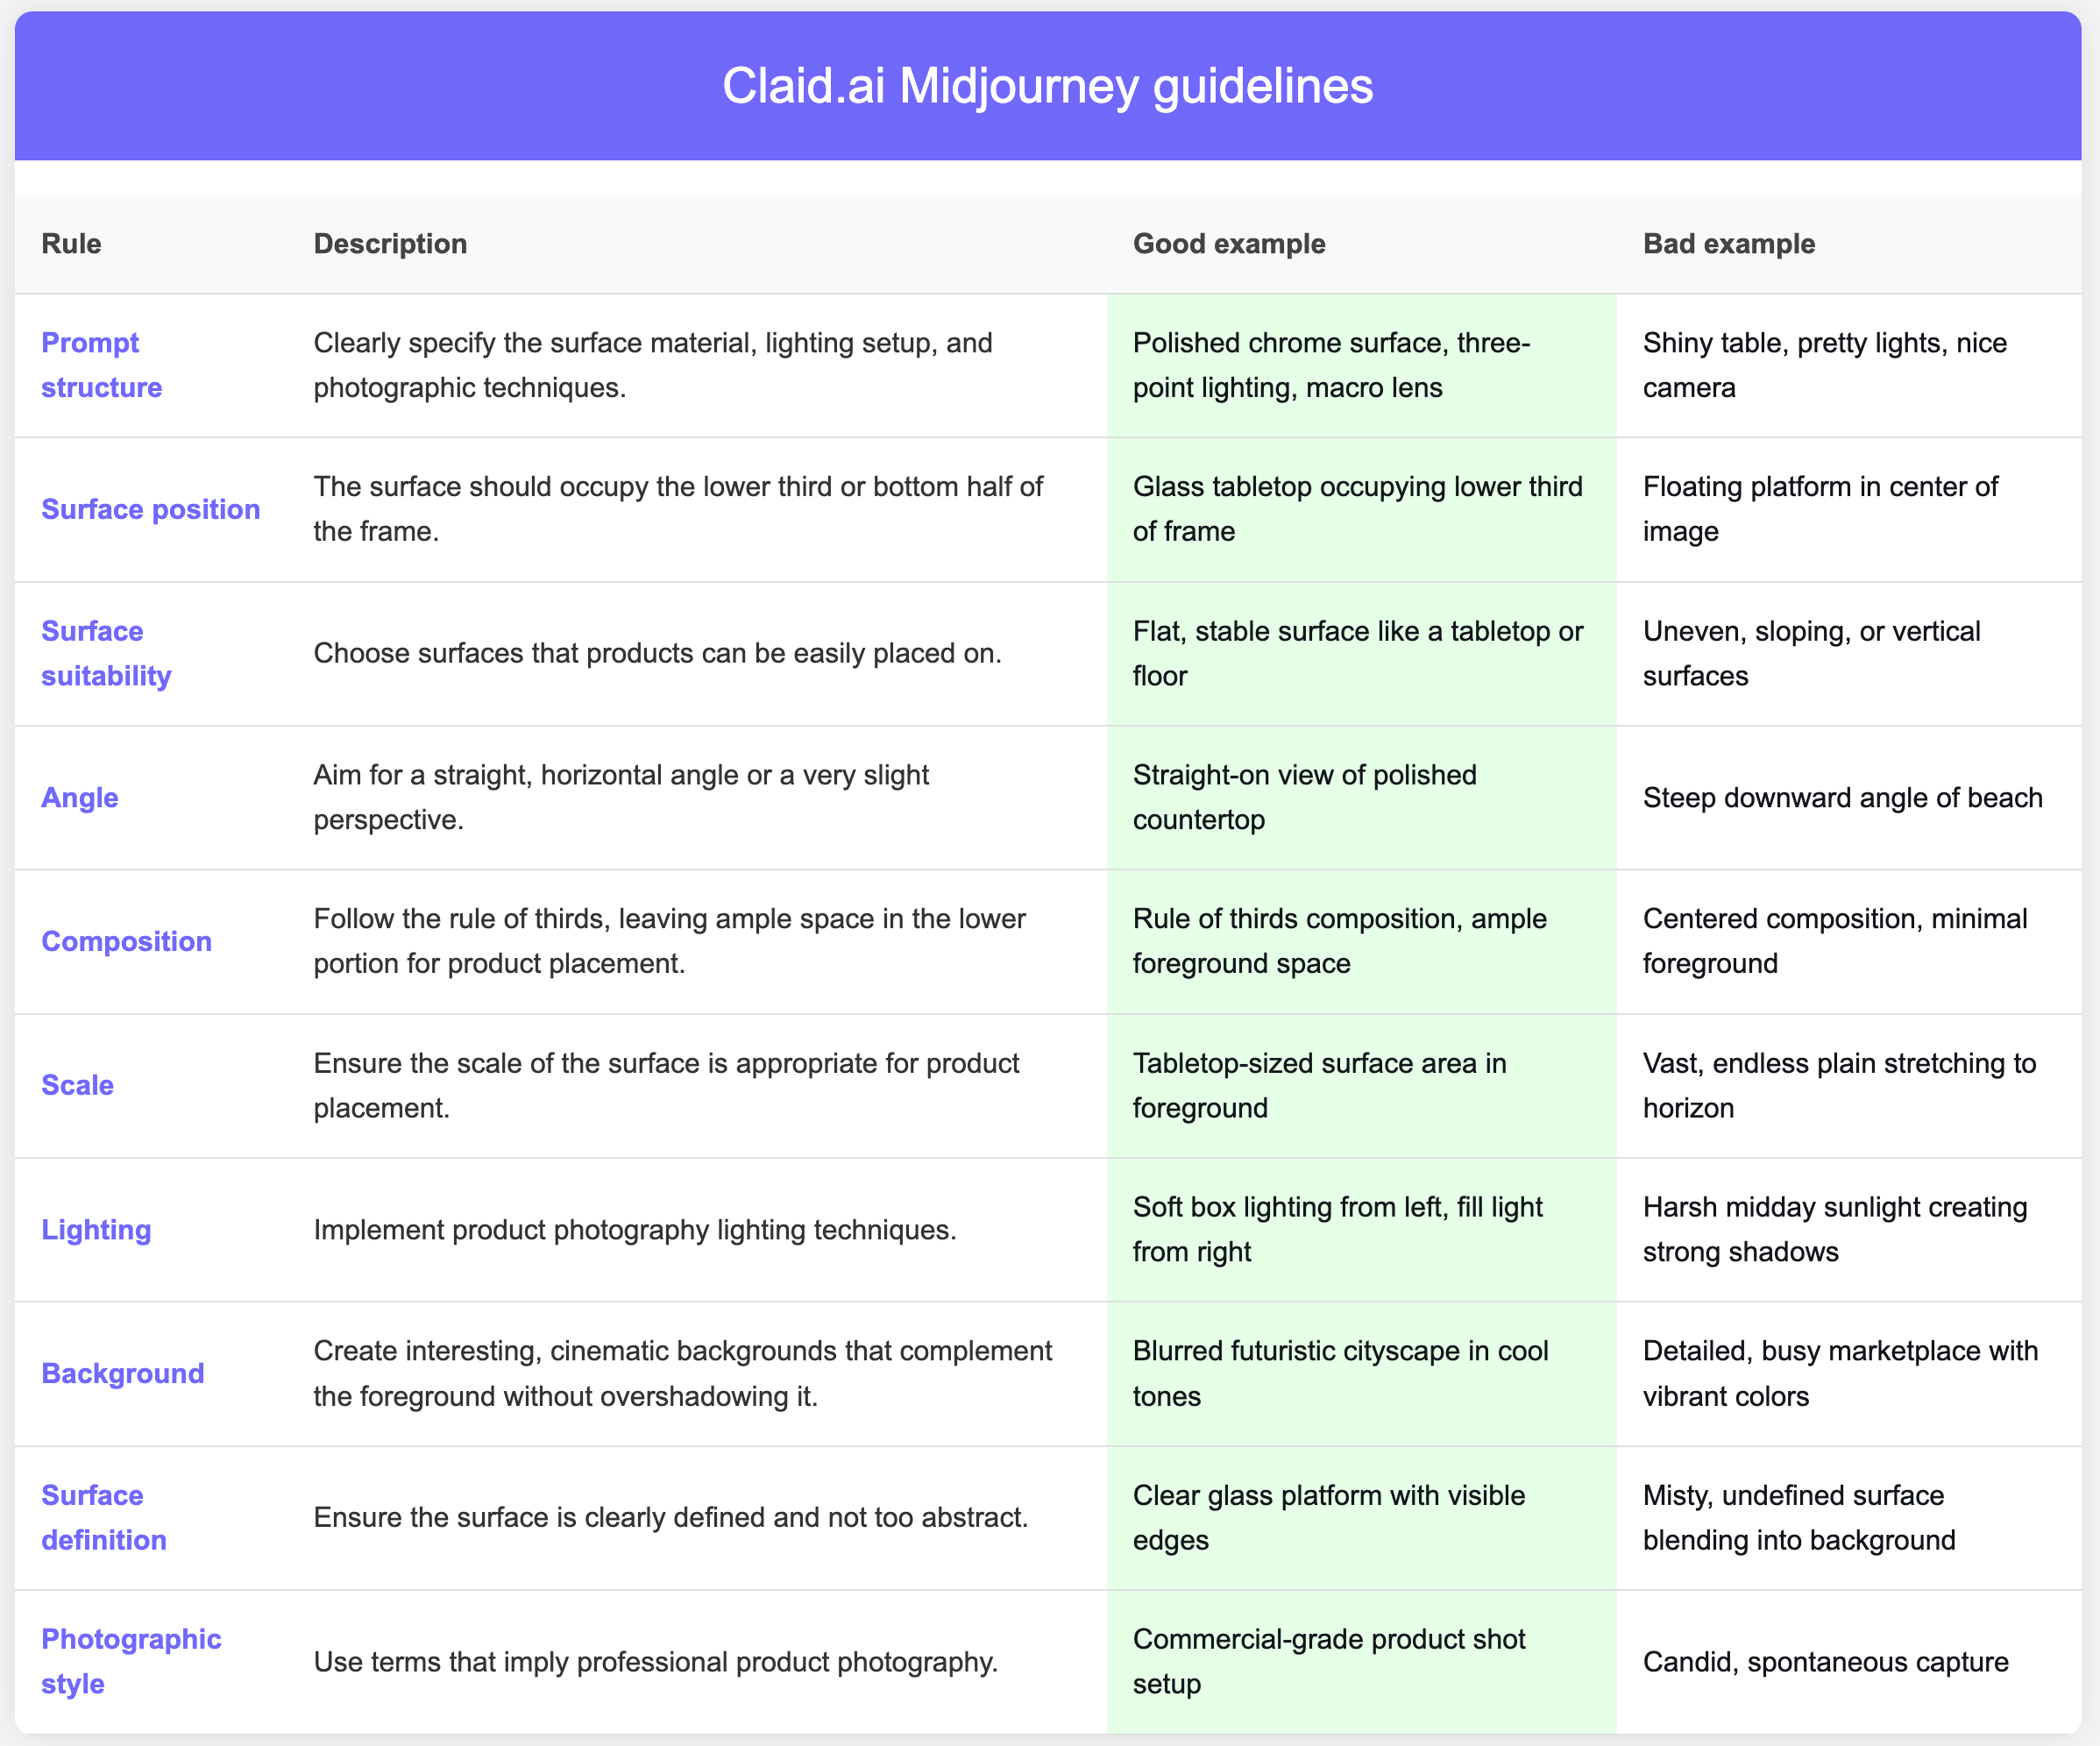
To ensure your Midjourney-generated background works seamlessly with Claid.ai, follow these guidelines:
- Clearly specify surface material, lighting, and photographic techniques
- Position the surface in the lower third or bottom half of the frame
- Choose flat, stable surfaces suitable for product placement
- Use a straight-on view or very slight perspective
- Follow the rule of thirds, leaving ample foreground space
- Ensure the scale is appropriate for product placement
- Implement product photography lighting techniques
- Create interesting, cinematic backgrounds that complement without overshadowing
- Clearly define the surface, avoiding abstraction
Advanced tips
For those looking to take their backgrounds to the next level, consider these advanced tips:
- Prioritize smooth surfaces, avoiding overly uneven textures
- Use color grading that enhances the surface without overpowering it
- Balance realism and fantasy (realistic surface, surreal background elements okay)
- Create depth with layers (foreground surface, midground elements, background)
- Enhance the surface's reflective properties through lighting
- Keep background complexity low to avoid overshadowing products
- Aim for a clean, professional studio atmosphere
- Specify high-quality, professional-grade imagery
- Design versatile backdrops suitable for various products
- Use tilt-shift or narrow depth of field effects to emphasize the foreground surface
💡 Pro tip: Set Midjourney style to “Raw” to get images that closely match your prompts.
Check out a few backgrounds we've generated based on these guidelines.
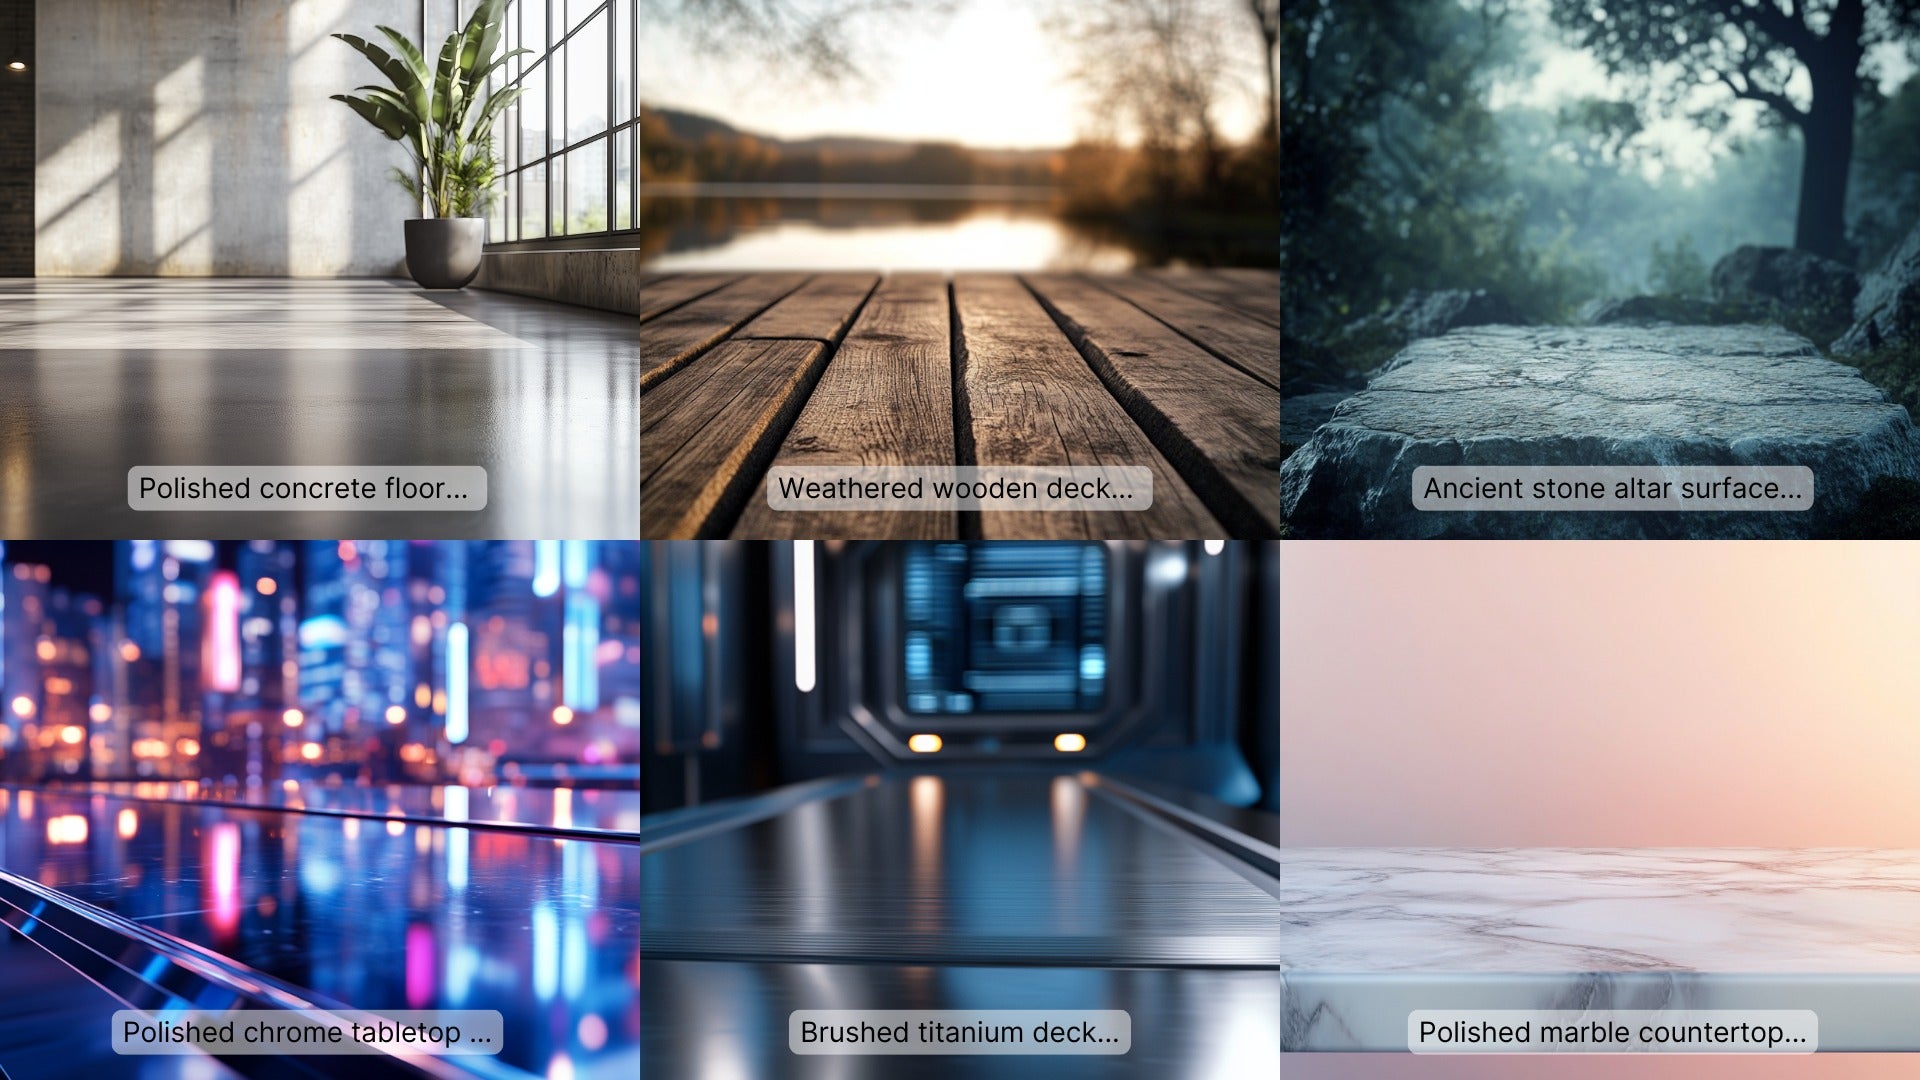
Feel free to reuse these prompts:
- Polished concrete floor, industrial loft setting. Soft natural light from tall windows. Shallow depth of field on smooth grey surface. Urban chic environment, muted color palette.
- Weathered wooden deck occupying lower half, blurred lakeside scenery behind. Rich wood grain texture, subtle afternoon shadows, calm water glimpse. Created using: Prime lens, rustic photography style, split-field composition, texture enhancement, warm color palette, subtle vignette effect, soft light diffusion
- Ancient stone altar surface filling bottom third. Sharp focus on smooth, rune-etched top. Misty fantasy forest backdrop, filtered moonlight. Mystical atmosphere, cinematic composition
- Polished chrome tabletop occupying lower third. Tilt-shift focus on mirror-like surface. Futuristic skyline background, neon lights reflected. Soft box lighting, cinematic color grading
- Brushed titanium deck occupying bottom third. Tilt-shift emphasis on sleek metallic sheen. Holographic HUD displays in background. Key light from left, fill light softening shadows
- Polished marble countertop filling bottom third, straight-on view. Soft gradient background in pastel tones. Three-point lighting setup, main light from right. Subtle veining in marble, cool white tones. Shallow depth of field, emphasis on smooth foreground texture. 8K resolution, professional studio quality
💡 Pro tip: For consistent branding, create a set of background templates that align with your visual identity.
3. Review the generated images and download your preferred option.
Let's continue with an ai background we've generated using the prompt: A polished marble tabletop, occupying lower third of frame, soft focus kitchen backdrop. Diffused natural light from side, subtle veining in marble, cool white tones. Created using: Macro lens, product photography lighting, tilt-shift effect, high-key exposure, depth of field control, color temperature adjustment, studio backdrop techniques
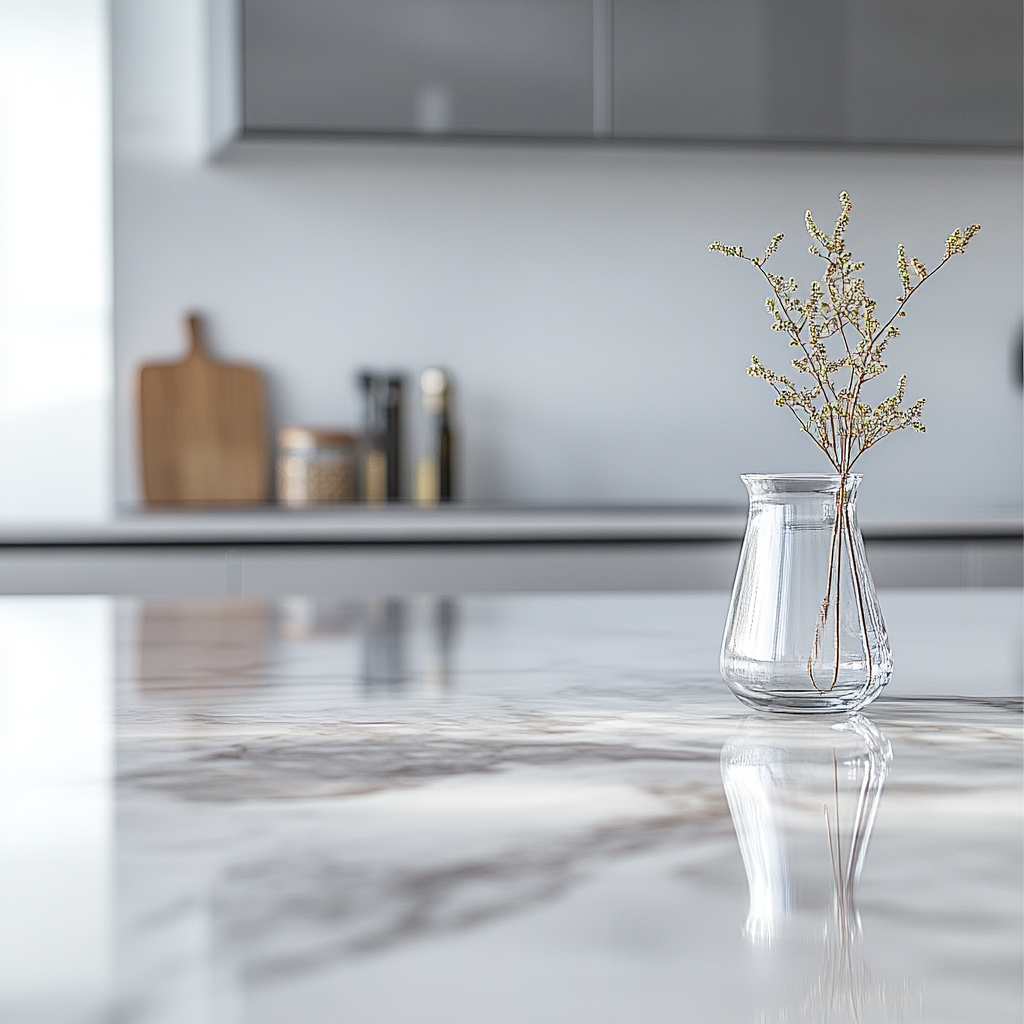
With your Midjourney background ready, it's time to move on to Claid.ai for product integration and final touches.
Add your product in Claid.ai
Claid.ai offers a user-friendly interface for seamlessly incorporating your product into the Midjourney-generated background. Follow these steps to achieve professional results:
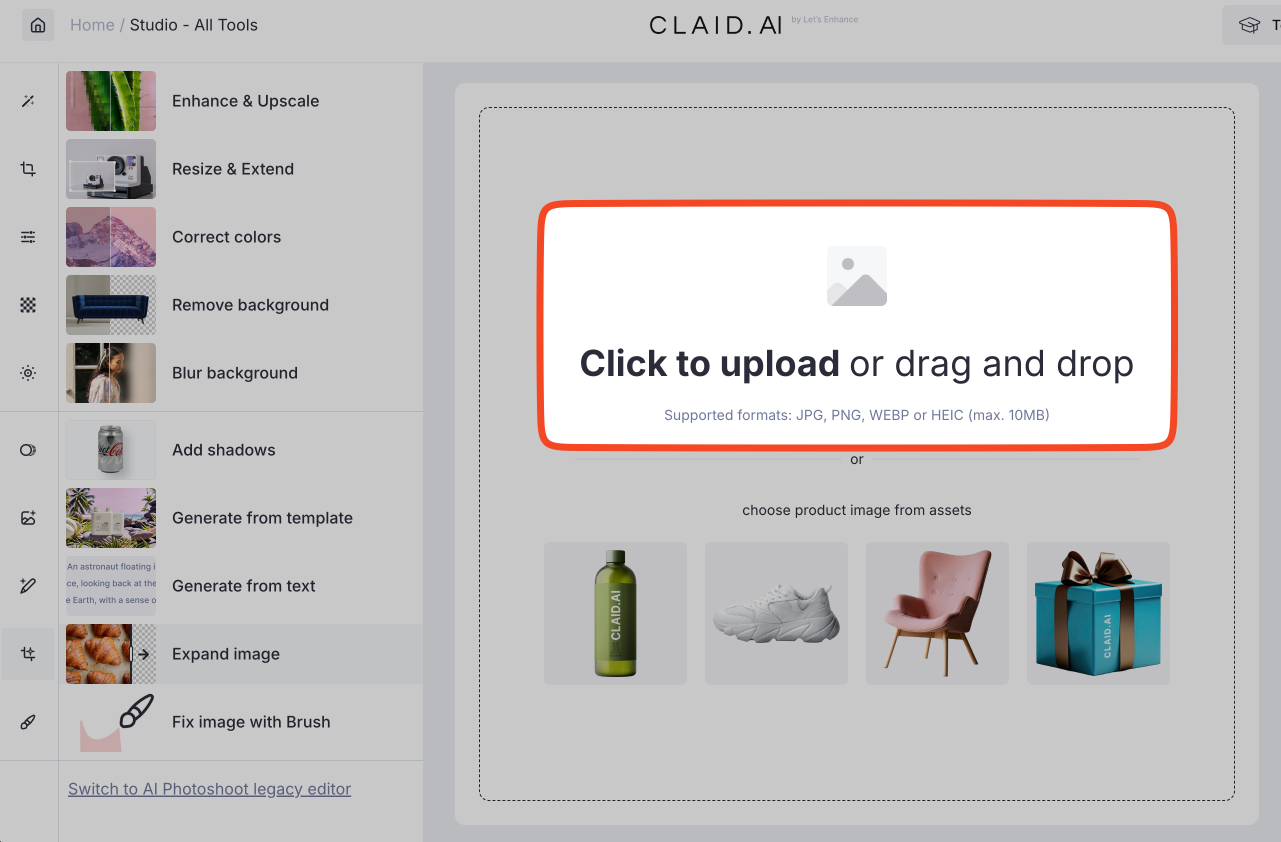
1. Log in to Claid.ai and access the studio dashboard.
2. Upload your product photo.
💡 Pro tip: If your initial image is low quality (smaller than 700x700px or has visible artifacts), use Claid's enhancement tools before applying further edits.
3. If needed, click "Remove background" and apply the operation.
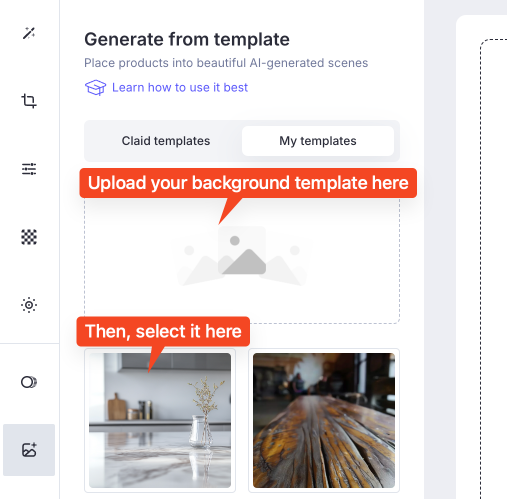
4. In the left menu, navigate to "Generate from template."
5. Select "My templates" tab.
6. Click "Upload your background template here" and choose your Midjourney image.
7. Resize and position your product to fit naturally in the scene.
💡 Pro tip: Pay attention to lighting direction in your Midjourney background and position your product accordingly in Claid.
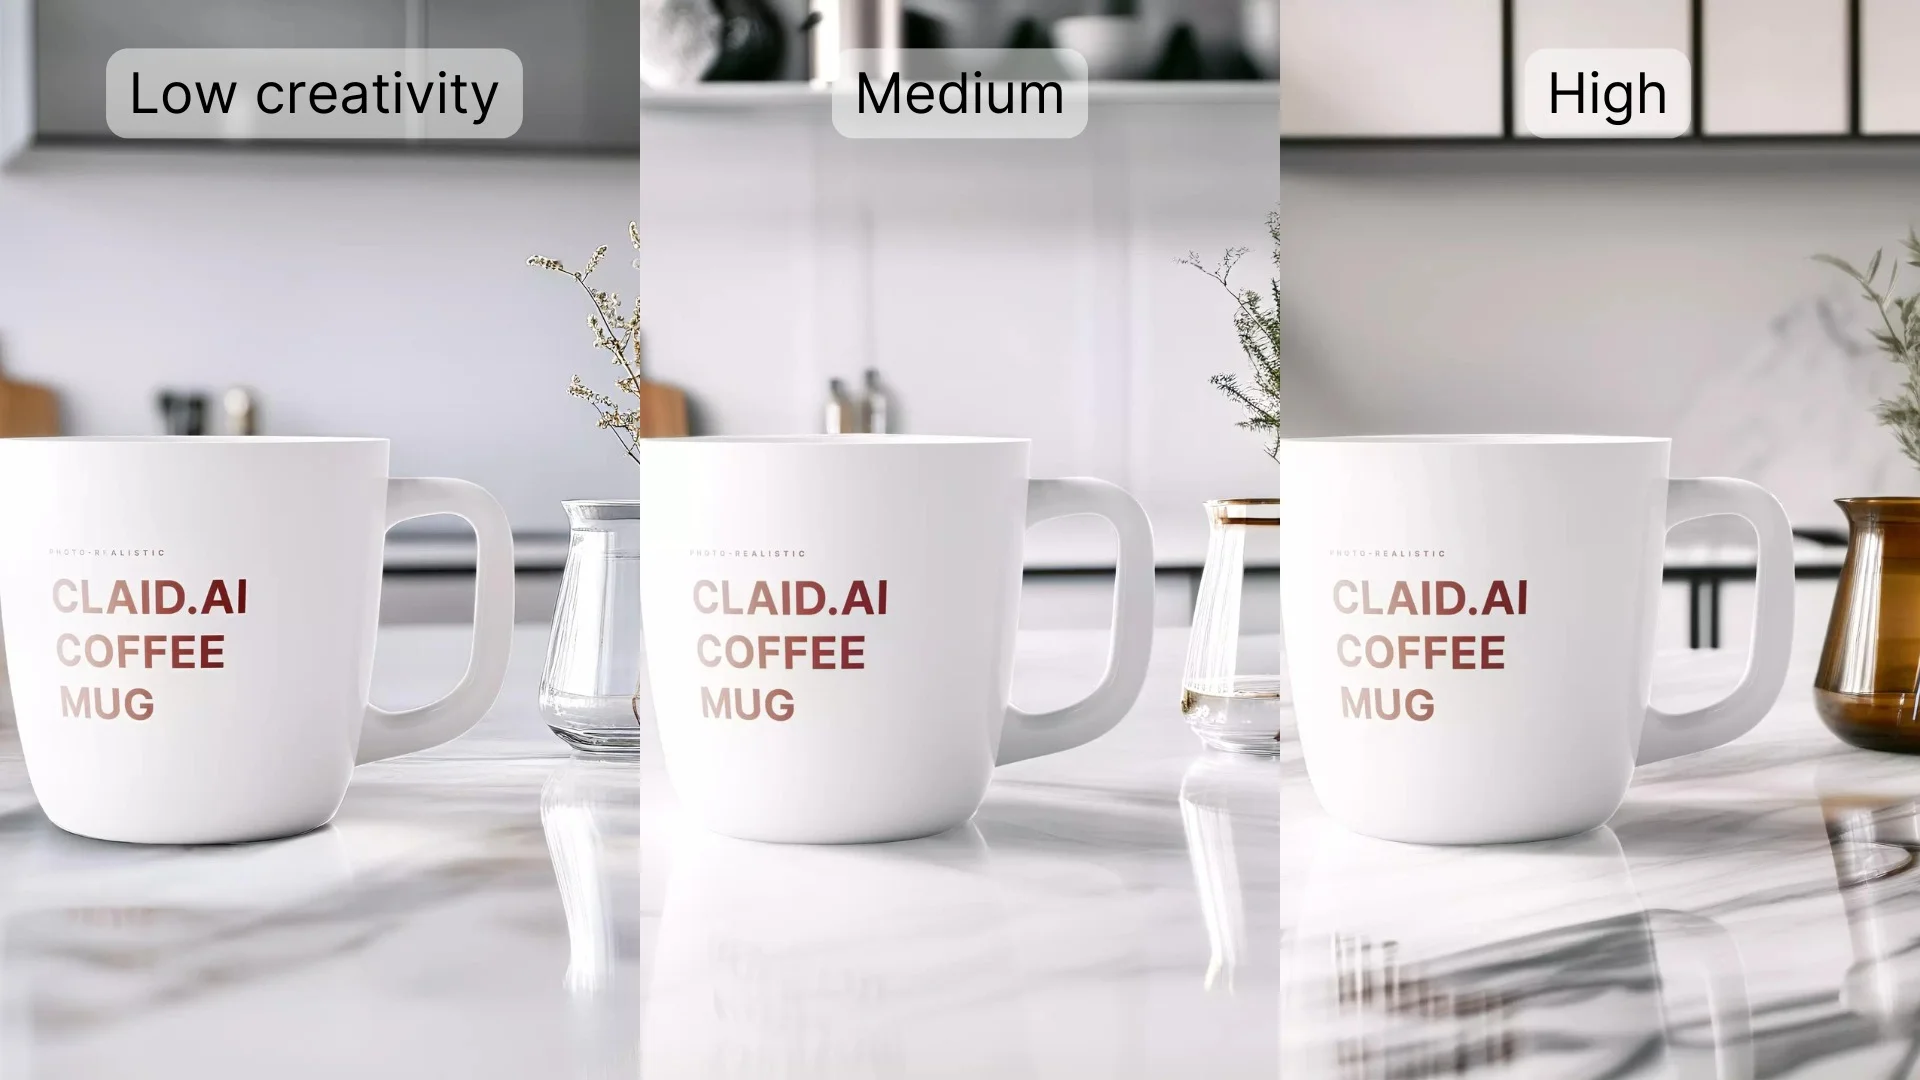
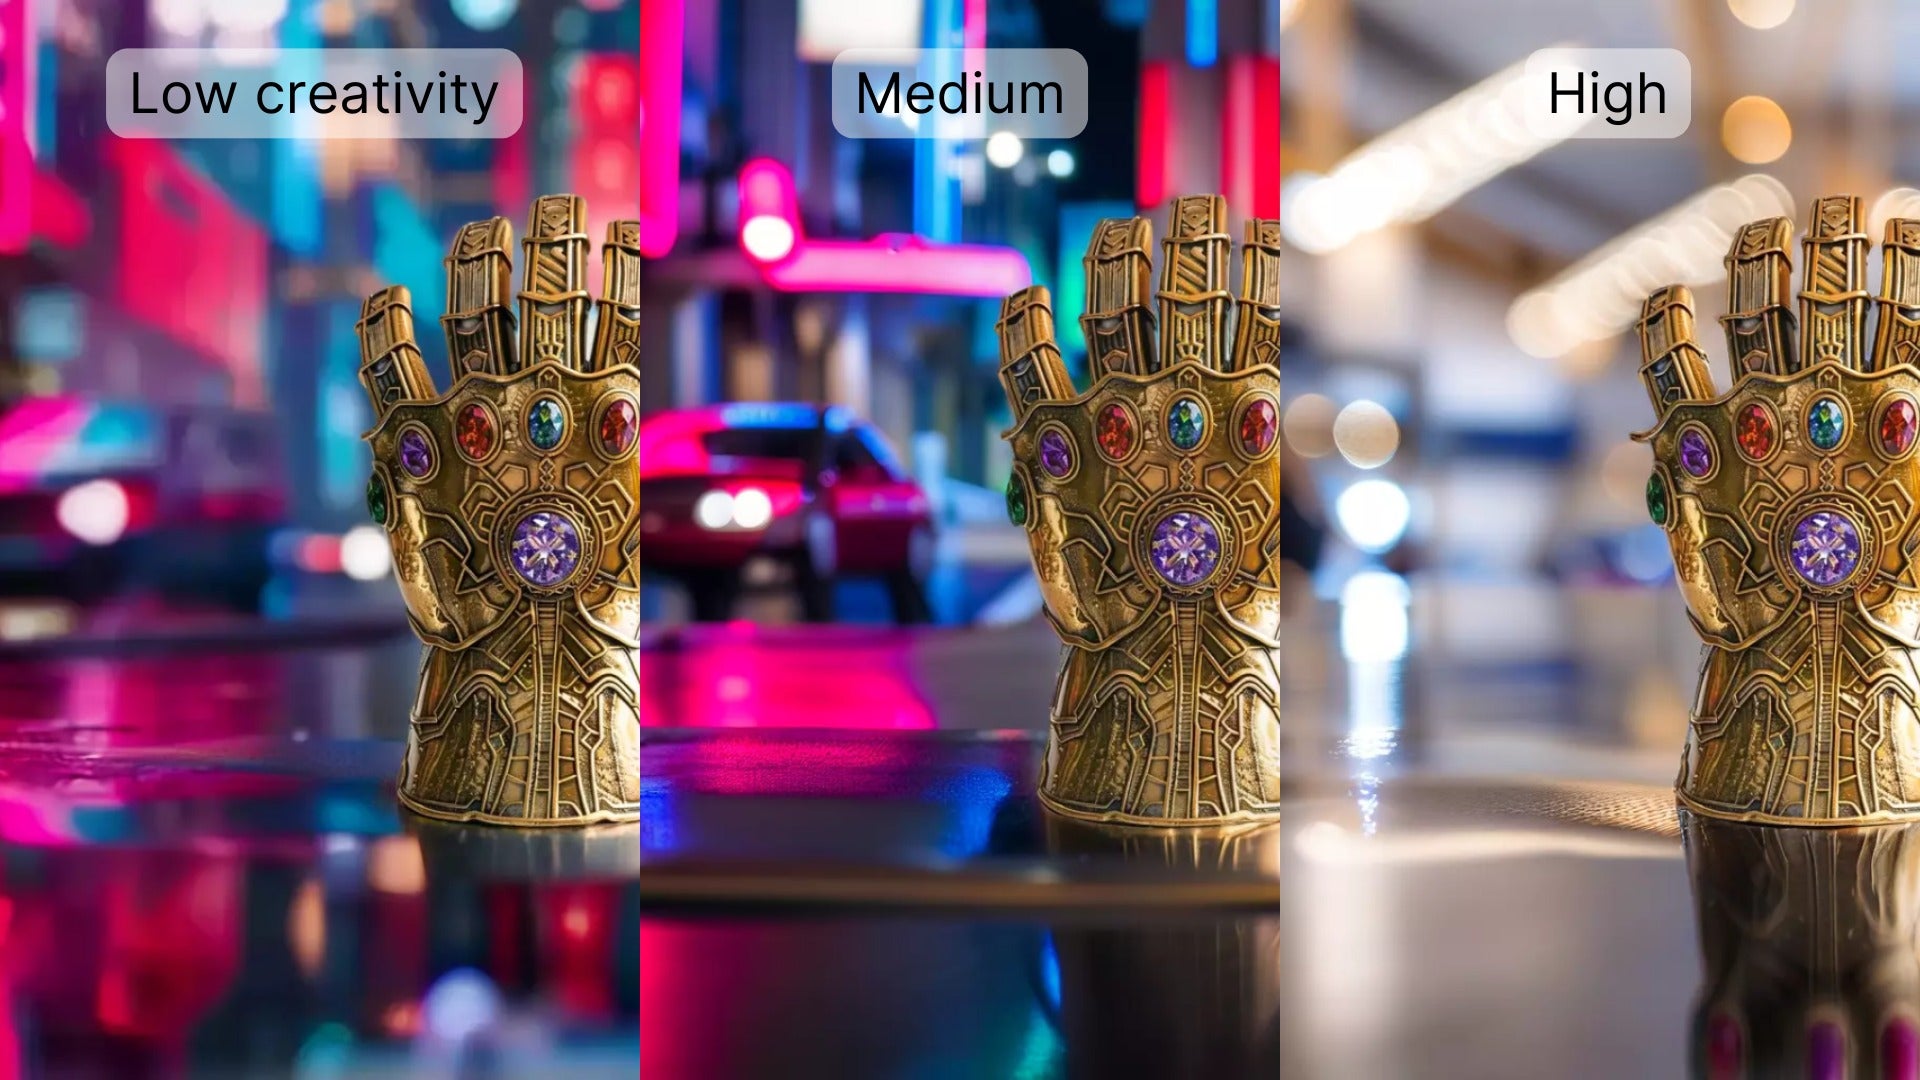
8. Set the creativity level:
- Low: Maintains the template background with minor adjustments for blending
- Medium: Balances template preservation and creative modifications
- High: Significantly alters the background using description and color settings while maintaining overall structure
- Try all: Generates three images (Low/Medium/High)
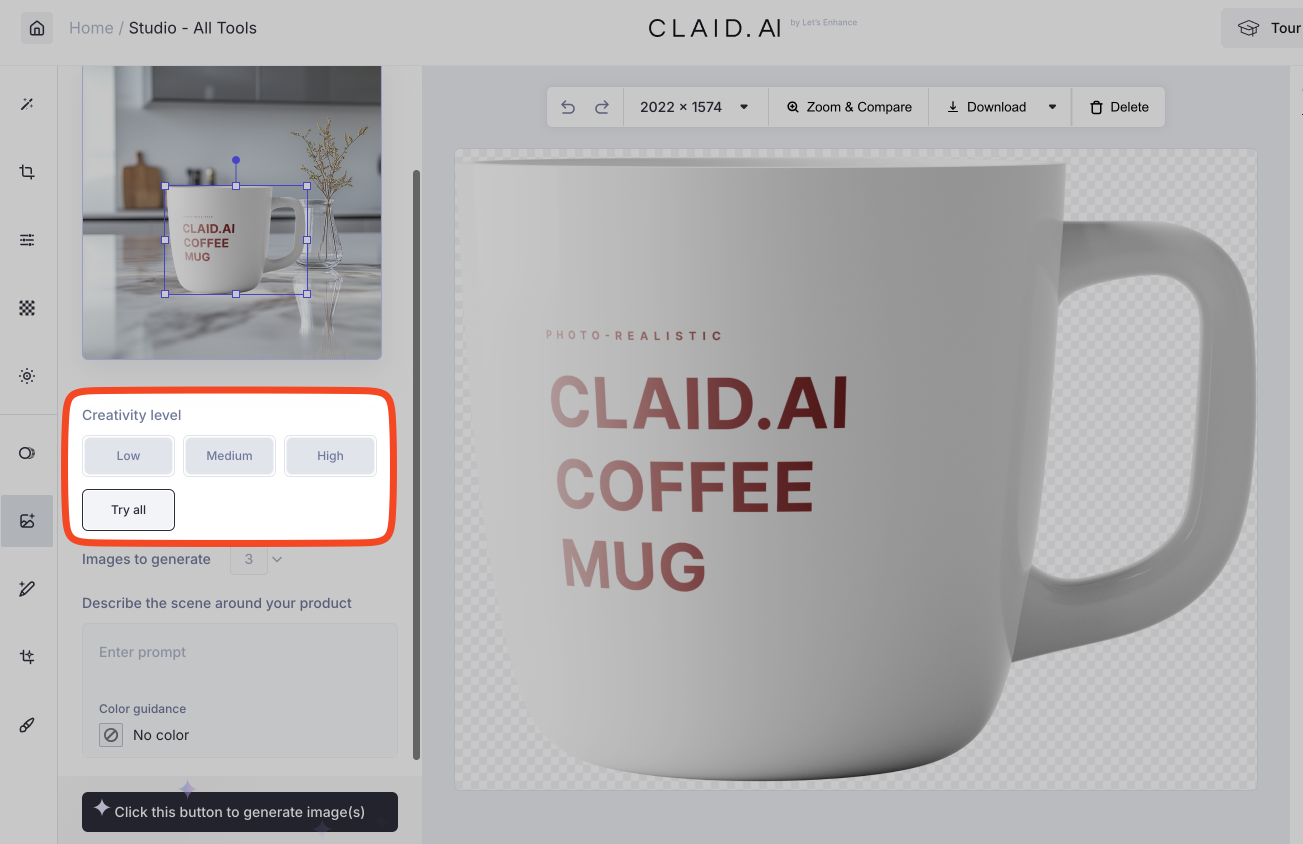
9. Click "Generate images" to start the process.
Claid.ai's AI will work its magic, integrating your product into the scene with appropriate lighting, shadows, and reflections for a realistic result.
Fine-tuning your results
Even with advanced AI, your first attempt may not always be perfect. Here are some strategies to refine your image:
If you're not satisfied with the initial output, try these adjustments:
1. Reposition your product in the scene
2. Try another creativity level
3. Modify color settings
4. Tweak the text description (only in High creativity mode). Check out our prompting guide for tips.
5. Generate multiple variations and choose the best
For more precise control, Claid's "Fix with Brush" tool is invaluable.
Here's how to use it effectively:
1. Select "Fix with Brush" from the left menu
2. Choose between "Erase" (remove elements) or "Regenerate" (replace areas with new content)
3. Carefully paint over the area you want to modify
4. Ensure you cover slightly beyond the edges for a smoother blend
5. For complete object removal, include shadows and reflections in the painted area
6. Click to apply the operation
If unwanted elements appear after using the Eraser, try erasing again or use the Undo button and repeat the process.
👉 Read the full guide: How to remove unwanted objects from photos with AI
Creating Claid templates from AI-generated product photos
Sometimes, you might want to use an AI-generated product photo as a template. Here's how to prepare it:
1. Generate a product photo using Midjourney or another AI tool
2. Upload the photo to Claid.ai
3. Go to "Fix with Brush" > "Eraser"
4. Paint over the central product or object, including shadows and reflections
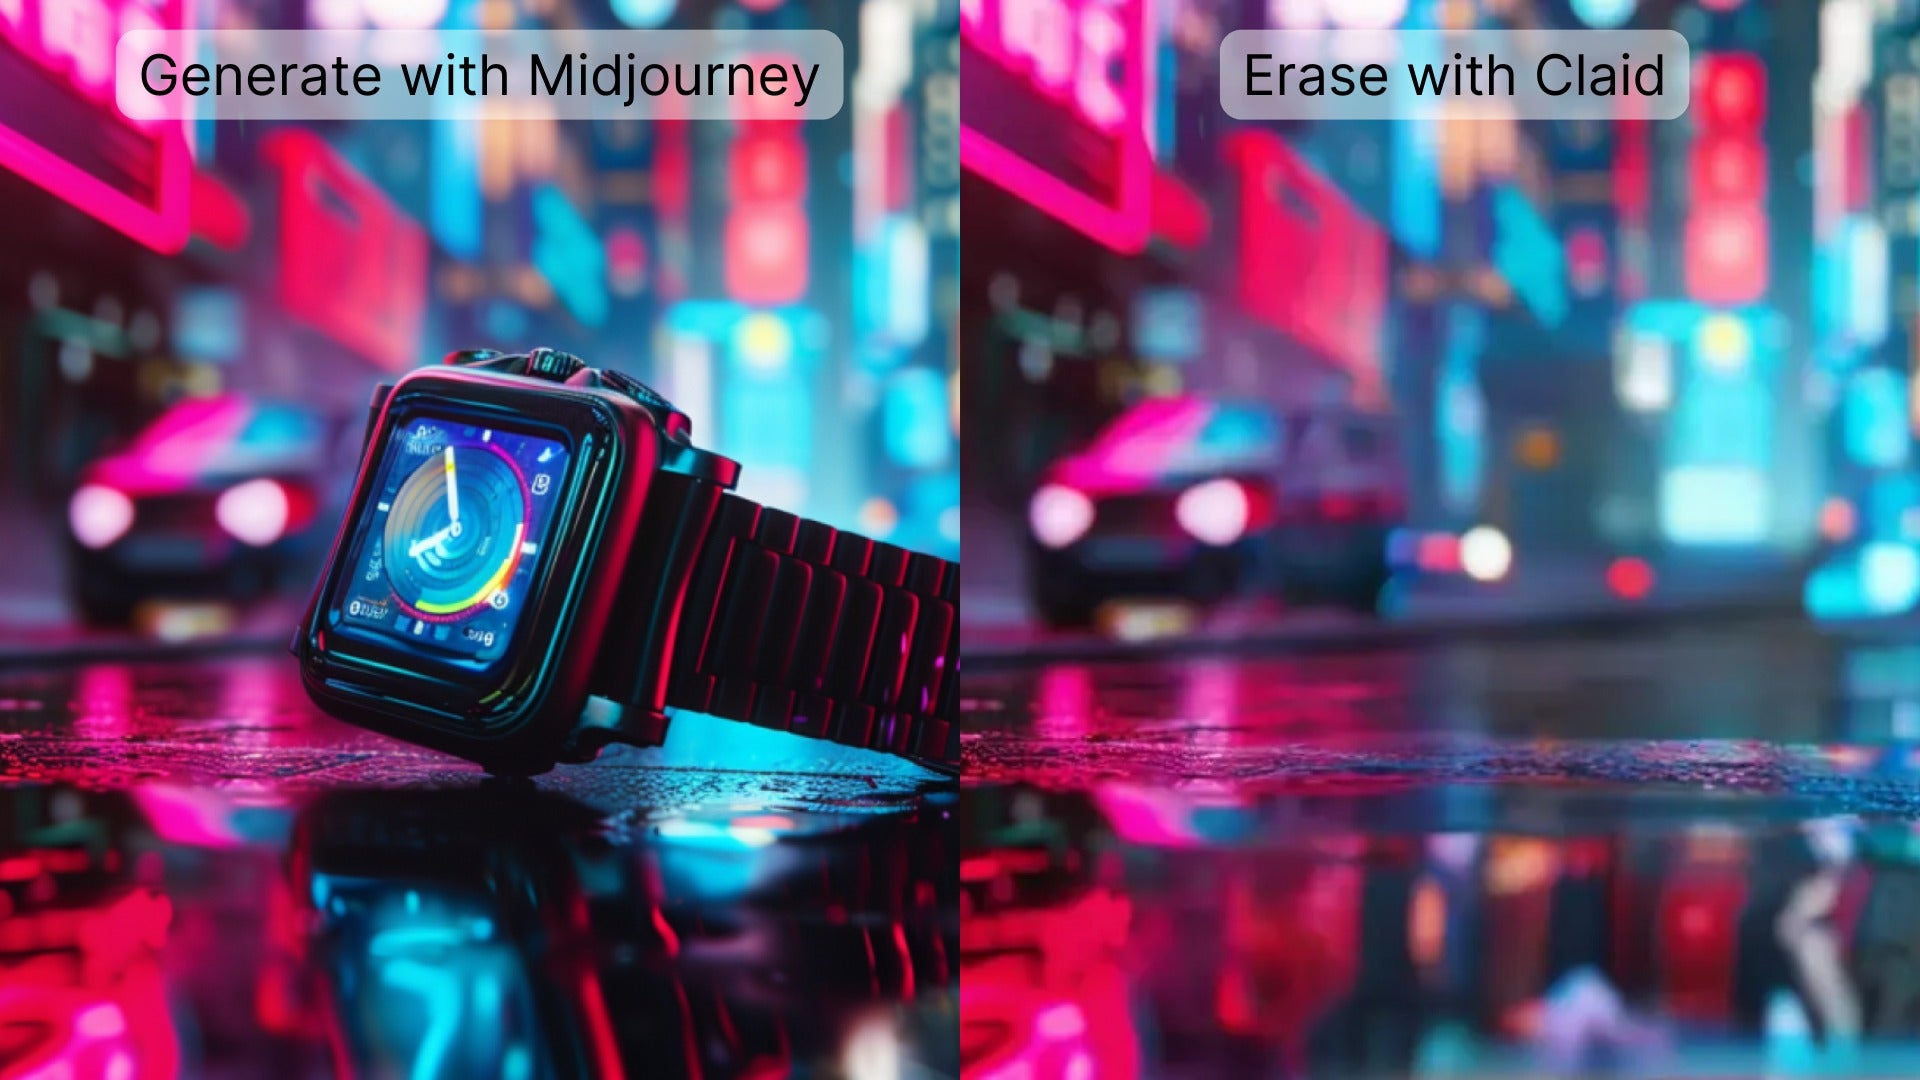
5. Download the edited image
6. Use this image as your background template in Claid.ai, following the steps outlined earlier
FAQ
Can I use Midjourney images commercially?
Check Midjourney's current terms of service. Images created with a paid subscription can be used commercially.
How do I make my AI product photos look more realistic?
Focus on lighting, shadows, and reflections. Use Claid.ai's tools to fine-tune these elements for a natural look.
What if I'm not satisfied with the generated result?
Try adjusting the creativity level, tweaking your product placement, or generating a new background in Midjourney with a modified prompt.
Can I use other AI image generators besides Midjourney?
Yes, you can use alternatives like DALL-E or Stable Diffusion. The process in Claid.ai remains the same.
How can I ensure consistent branding across multiple product photos?
Create a set of background templates that align with your brand aesthetic. Use these consistently in Claid.ai for a cohesive look.
By combining Midjourney's background generation with Claid.ai's product integration, you can create professional-looking product photos quickly and affordably. This technique is especially useful for eCommerce businesses, digital marketers, and anyone needing high-quality product visuals without the expense of a traditional photo shoot.
Need this at scale?
Process thousands of images via API, or let our team handle it for you.