Tech
Adapting Photos for Shopify Size and Format Guidelines


Easy Guide to Shopify Product Image Guidelines
Nail your product images every time with this easy and quick guide to working with Shopify’s visual content.
Takeaways
- Key guidelines for Shopify include image resolution, aspect ratio, format, and file size, among others;
- By standardizing the quality of product photos, sellers can improve their brand perception, maintain visual consistency, and improve the rank of their listings.
- AI Photoshoot creates backgrounds for product photos based on templates and text prompts, making professional product photos more accessible;
- Claid.ai's Generative Resize can adapt the resolution and layout of standard photos to suit the guidelines of popular social media and eCommerce platforms;
Quick Guidelines for Shopify Product Photos
These are the most basic guidelines for product photos on Shopify.
Image Dimensions and Resolution: Square image, maximum 4472 x 4472 px;
Aspect Ratio: 1:1;
Format: JPEG, Progressive JPEG, PNG, GIF, HEIC, WebP, AVIF;
File Size: 20MB Max.
It’s important to keep in mind, that there are no strict guidelines when working with guidelines such as backgrounds, padding, or additional graphics. However, there are some general rules that can help product managers and vendors make the best of their visual content.
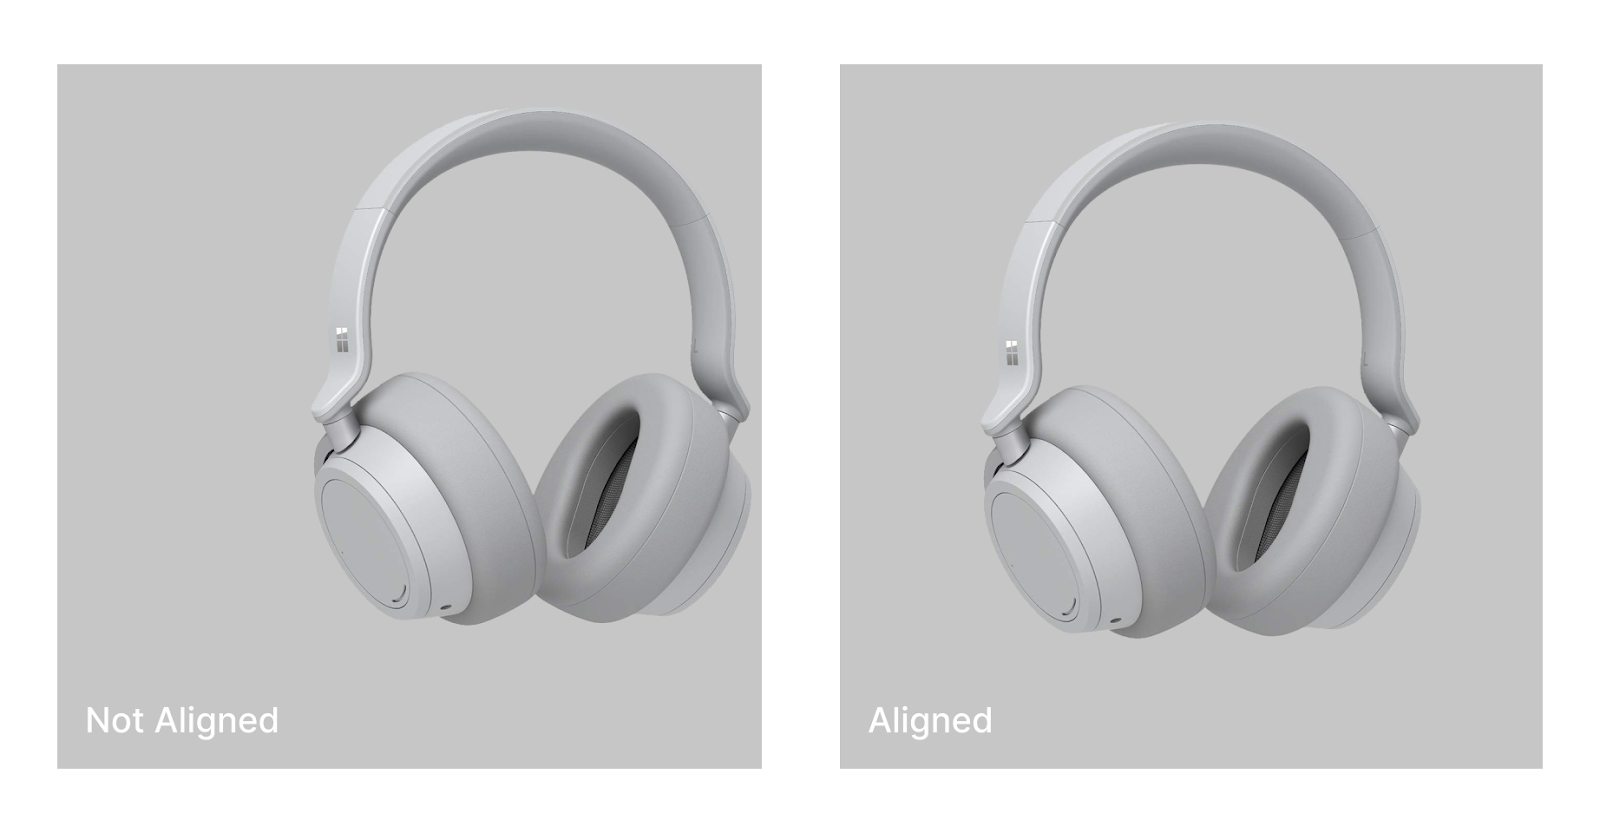
Keep padding (the empty area on the canvas around the product image) 10-20%. This will ensure that the product does not look oversized on the canvas, or too small where important details are hard to see.

Align the product to the center of the canvas. This is done not only for aesthetic purposes but also to make browsing through listings easier, since all products are centered on the canvas, as opposed to all over the place.
These are the fundamental image guidelines that must be followed to keep the quality of product photos consistent across the board.
And it’s also important to remember that there are many other product visual guidelines and these are not exclusive to just one platform. Check out this in-depth guide on how to create and maintain consistent image guidelines for eCommerce platforms.
Why Use High-Quality Visuals on Shopify
There are a number of reasons why sellers should prioritize high-quality product photos and visual content not just on Shopify, but eCommerce as a whole. Here’s just a small snippet of that reasoning.
- Positive First Impression
- Consistent Brand Quality
- Improved Buyer Experience
- Favorable Rankings
Positive Brand Perception
Few things can tarnish brand perception worse than visual quality that’s all over the place. Keep in mind, that visuals such as product header image, are the first touchpoints between products and buyers, so sellers really need to make them count.
Using high-quality product visuals means customers who interact with a brand have a much more positive first impression and are more likely to make a purchase.
Consistent Quality
One of the fundamental methods of creating and maintaining a brand visuals identity is by using consistent product and brand visuals. Consistent quality plays a huge role in how recognizable your brand will be, this it’s important to maintain it across the board.
On Shopify, this means editing content to consistent guidelines and quality. Keep all visual content the same resolution, and use similar backgrounds and themes to maintain visual consistency. This way, those who browse through a particular category of products regularly will begin to remember your visuals and, in turn also remember your brand.
Improved Buyer Experience
Ever browse through an online marketplace that is visibly less strict on its guidelines and feel like it’s a little disorientating when compared to platforms like Amazon? Here’s a visual example of this sensation:
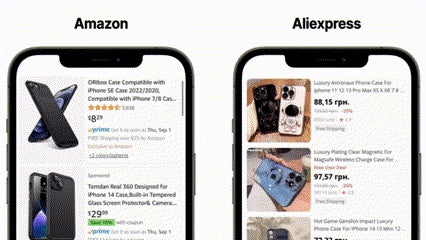
Notice how the visuals on Amazon are all consistent, with clear backgrounds, orientated in a similar position, and angled in such a way that the whole product is visible, whereas Aliexpress is all over the palace.
The result is a far more pleasant browsing experience for those using Amazon since their eyes don’t have to readjust every time they scroll through more products, whereas on Aliexpress, buyers have to take a pause every time a new product is on screen simply to look through its details.
Favorable Rankings
eCommerce platforms set image guidelines not solely for aesthetic, but also technical reasons. For example, Shopify does not accept images larger than 20MB. This is done to maintain short load times for users.
Compress images to smaller file sizes to keep load times low and your product rankings high.
Using AI Photoshoot to Create Background
With all these guidelines in mind, here’s how to turn a regular photo taken with a phone camera into a professional product image that is Shopify-ready. As always, the very first thing you should do is create a Claid.ai account. Then visit the AI Photoshoot dashboard to get started.
Step 1: Upload the Photo
Click in this general area to upload an image.
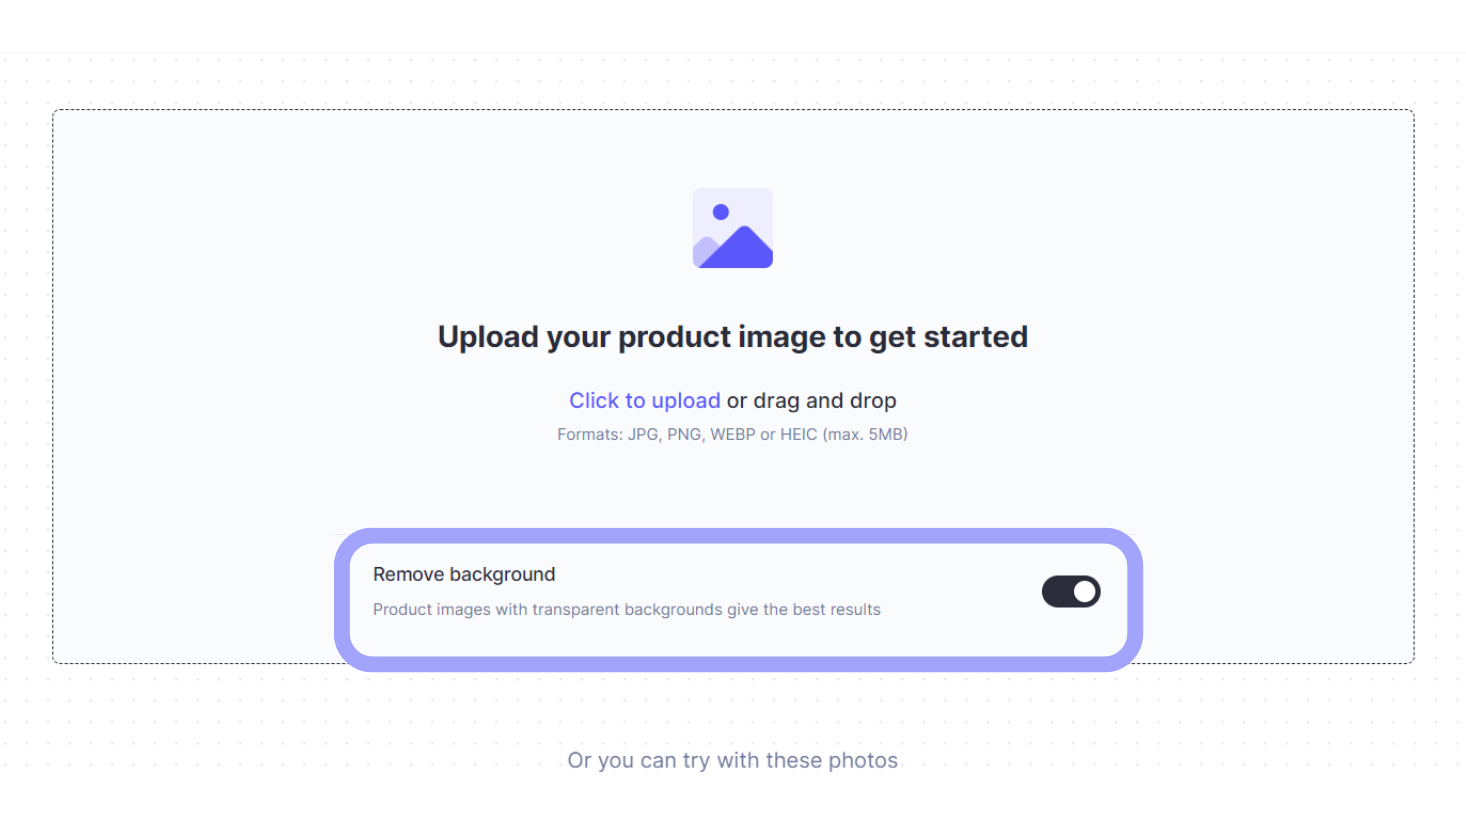
It is highly recommended that the Remove Background feature is enabled. This will remove the distracting background of the original photo, allowing AI Photoshoot to fill in the canvas.
Step 2: Select Background Template
From the menu to the left select a background template category.
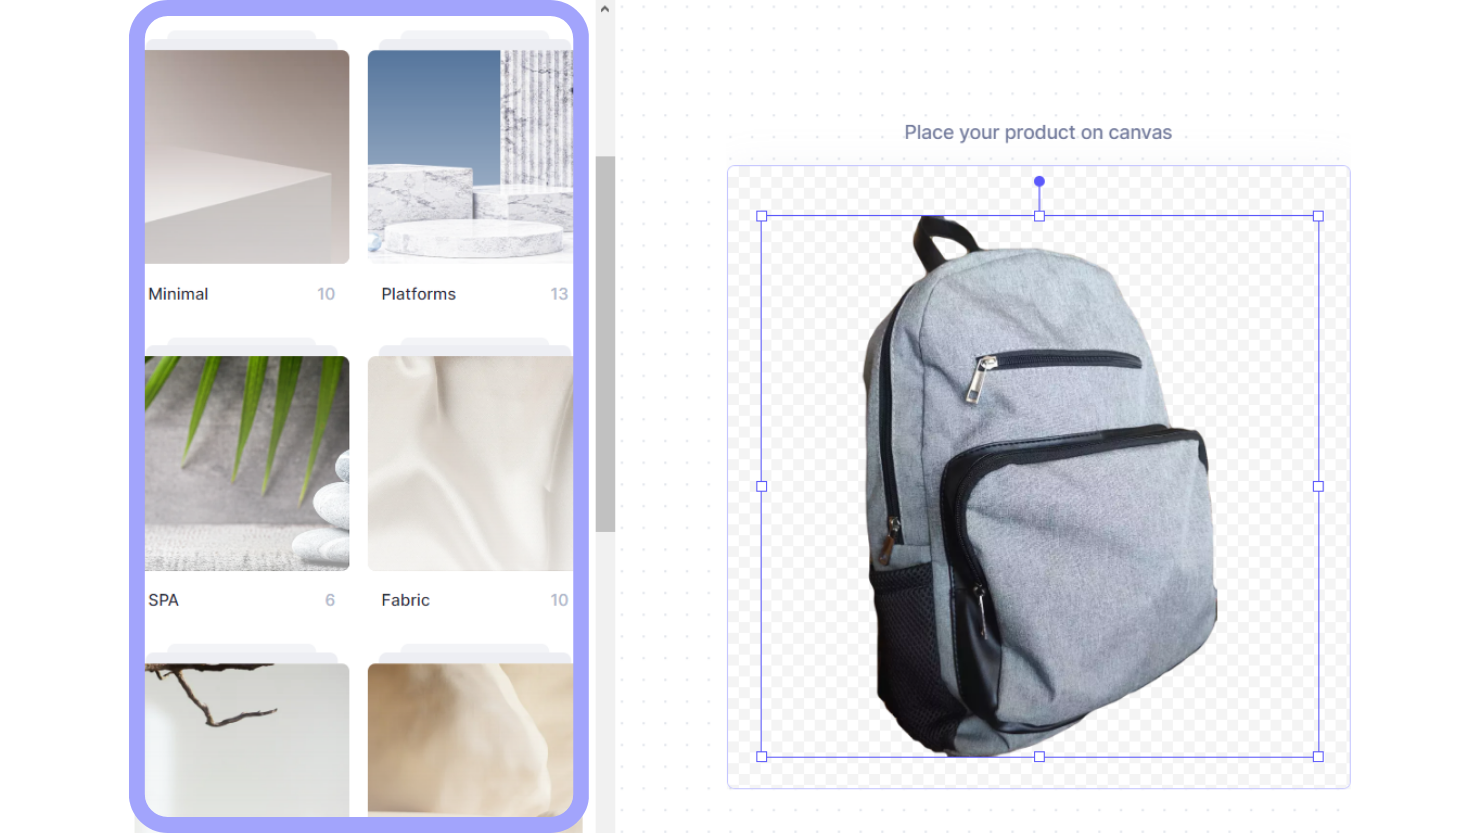
Once a category has been selected, choose a specific template background.
💡 Pro Tip: Users have the option of not selecting a template and solely using the text prompt option to render a background. The templates are there to make it easier to frame and adjust a product onto the canvas, however with an accurate text prompt, it is also possible to create a background entirely from scratch.
Step 3: Resize and Adjust Product on Canvas
A product should look natural on the background. Nothing puts customers off more from a product then it seeming as though the photo was hastily put together with Photoshop.
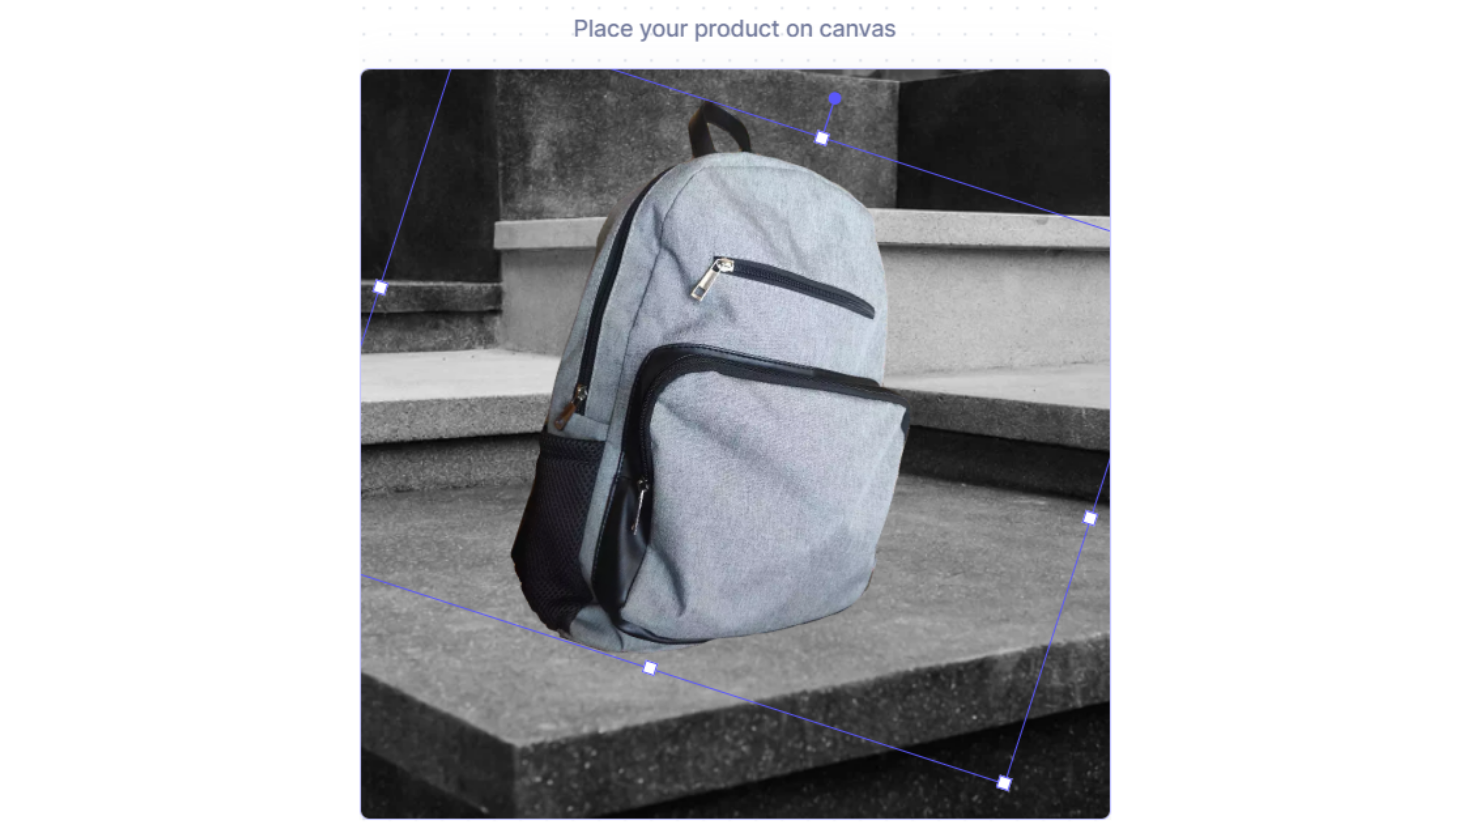
This is why it’s important to make the product look as natural on the background as possible, especially considering that the surroundings are being rendered with AI. Resize and rotate the product to look authentic on the surface of the template, which in the case of the example above, is a square slab.
Step 4: Write a Text Prompt
Rendering a background for product photos with AI Photoshoot is incredibly simple thanks to how easily the AI understands and delivers users the exact visuals they are looking for. But as with any AI image generator, the more specific the text prompt, the more refined the results will be.
AI Photoshoot is no different. The more descriptive the text prompt, the more accurate the results will be to the user’s expectations.
Check out this guide on the most effective text prompts for AI Photoshoot.
Step 5: Click Generate and Download
Then simply click Generate to render the product photo background. This process takes only a few seconds.
AI Photoshoot will generate 4 unique variations of the same prompt.
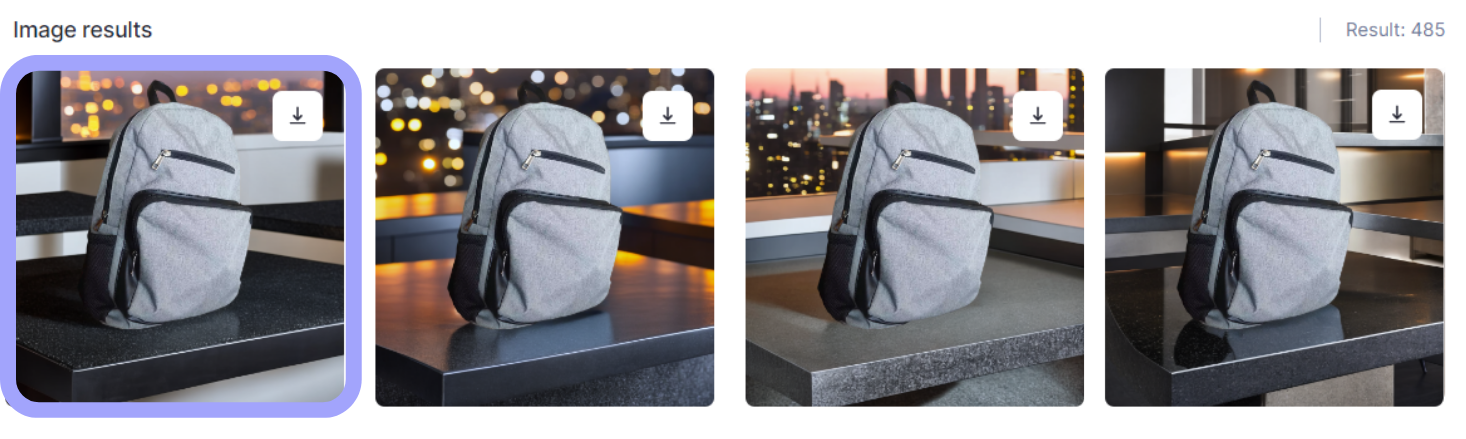
Each one can be downloaded by clicking on the downward arrow. To give the prompt another try, click on the Generate button once more.
💡 Pro Tip: AI Photoshoot, as with any other AI platform, learns more the more its being used. This means that users will not always find the best results in the first batch of renders (though there’s a good chance they will). But don’t worry! Just give it another try and see what improvements AI Photoshoot makes the second time around.
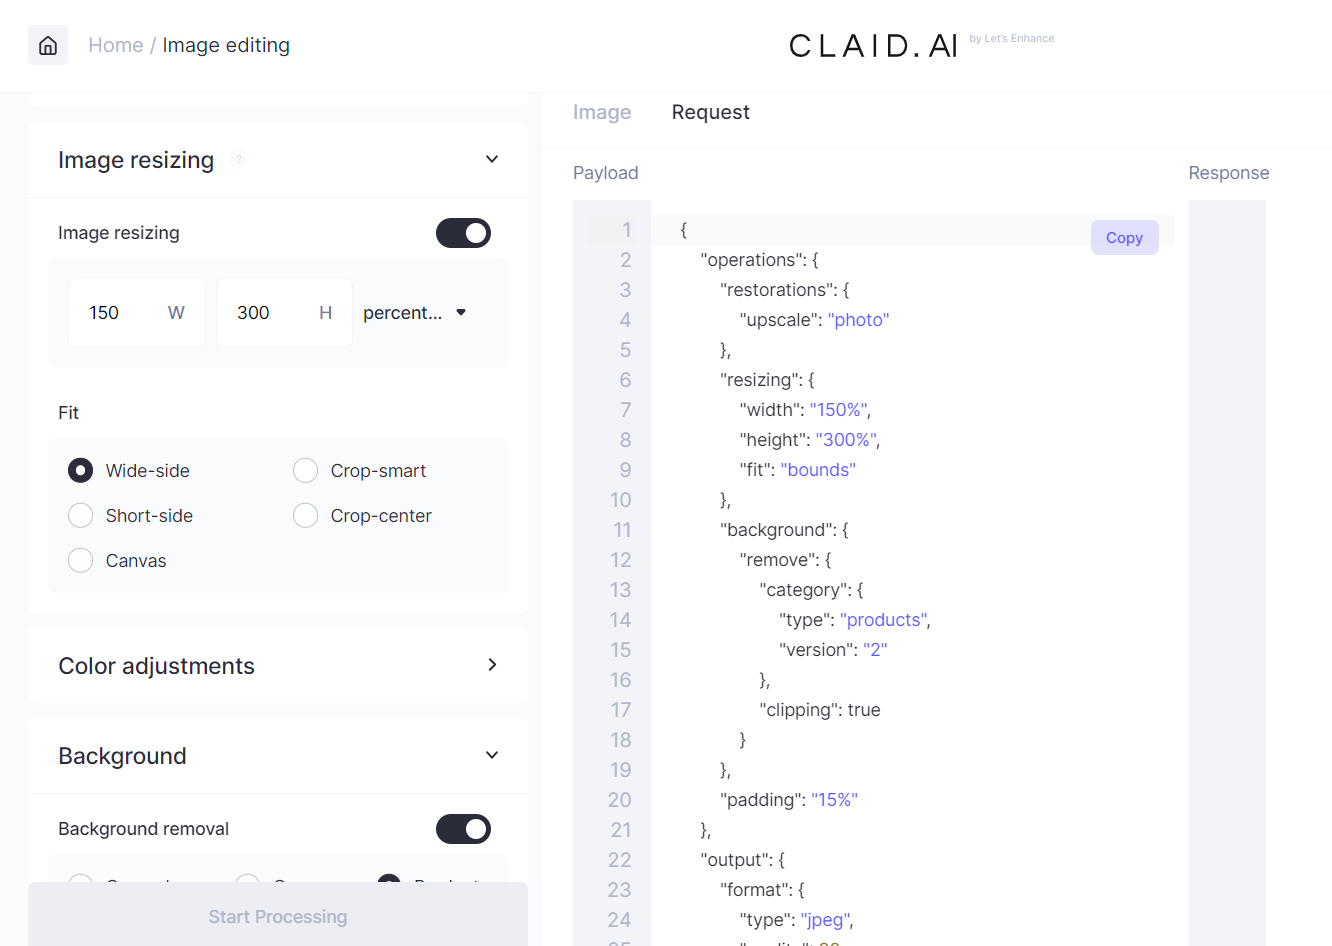
Using Generative Resize to Optimize Shopify Photos
But we’re not done yet, as the visual is not entirely ready for Shopify. While there is no dedicated Shopify image resizer, Claid.ai has you covered.
By default, AI Photoshoot renders 1024x1024px images, which is well within the recommended guidelines on the Shopify platform. However, AI Photoshoot can do better; much better.
Pick one of the rendered visuals and click on it to open this panel:
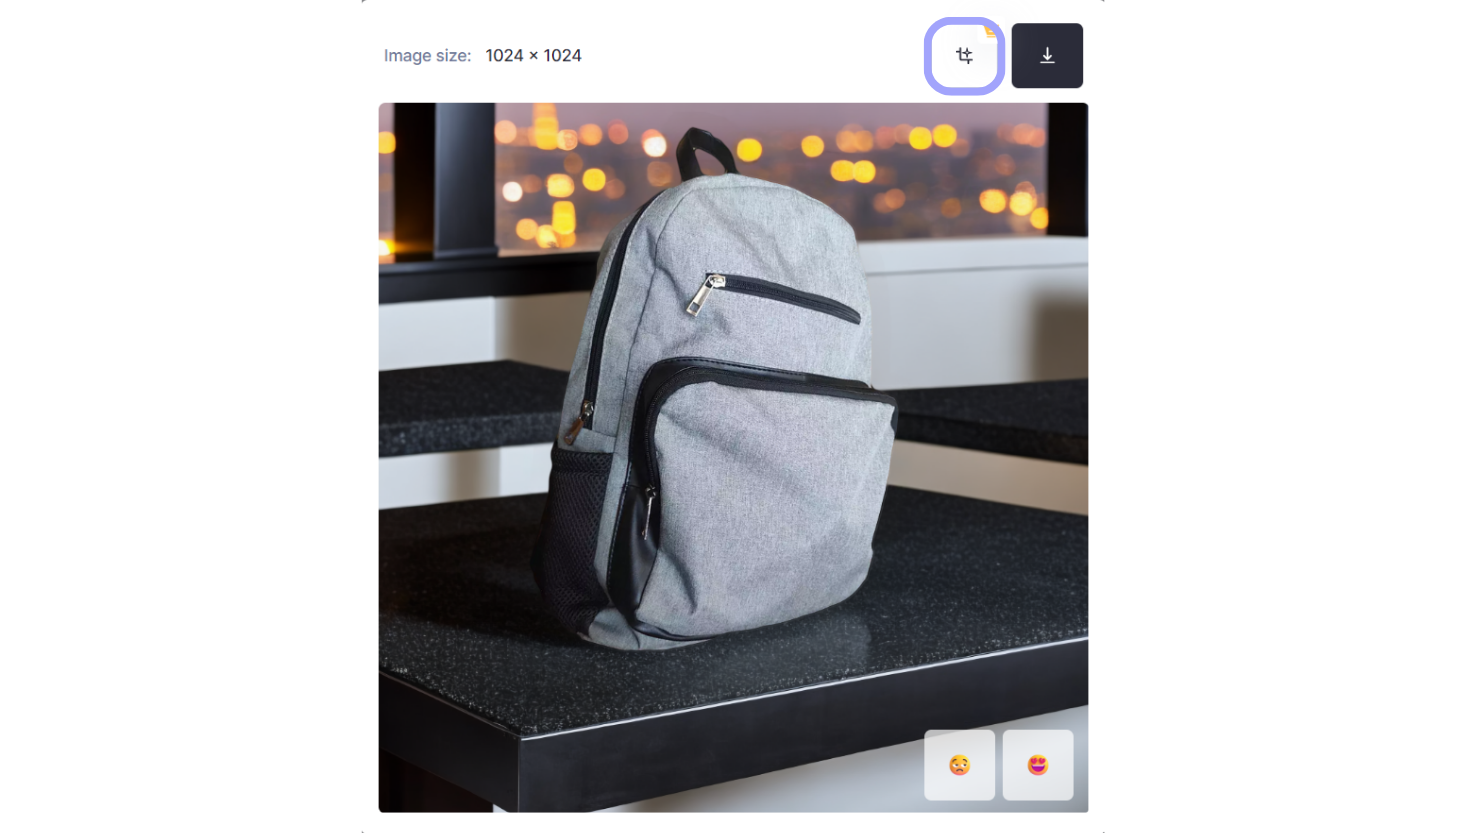
Click on the Generative Resize button at the top right corner of the screen next to the Download button and it will then open the Generative Resize window.
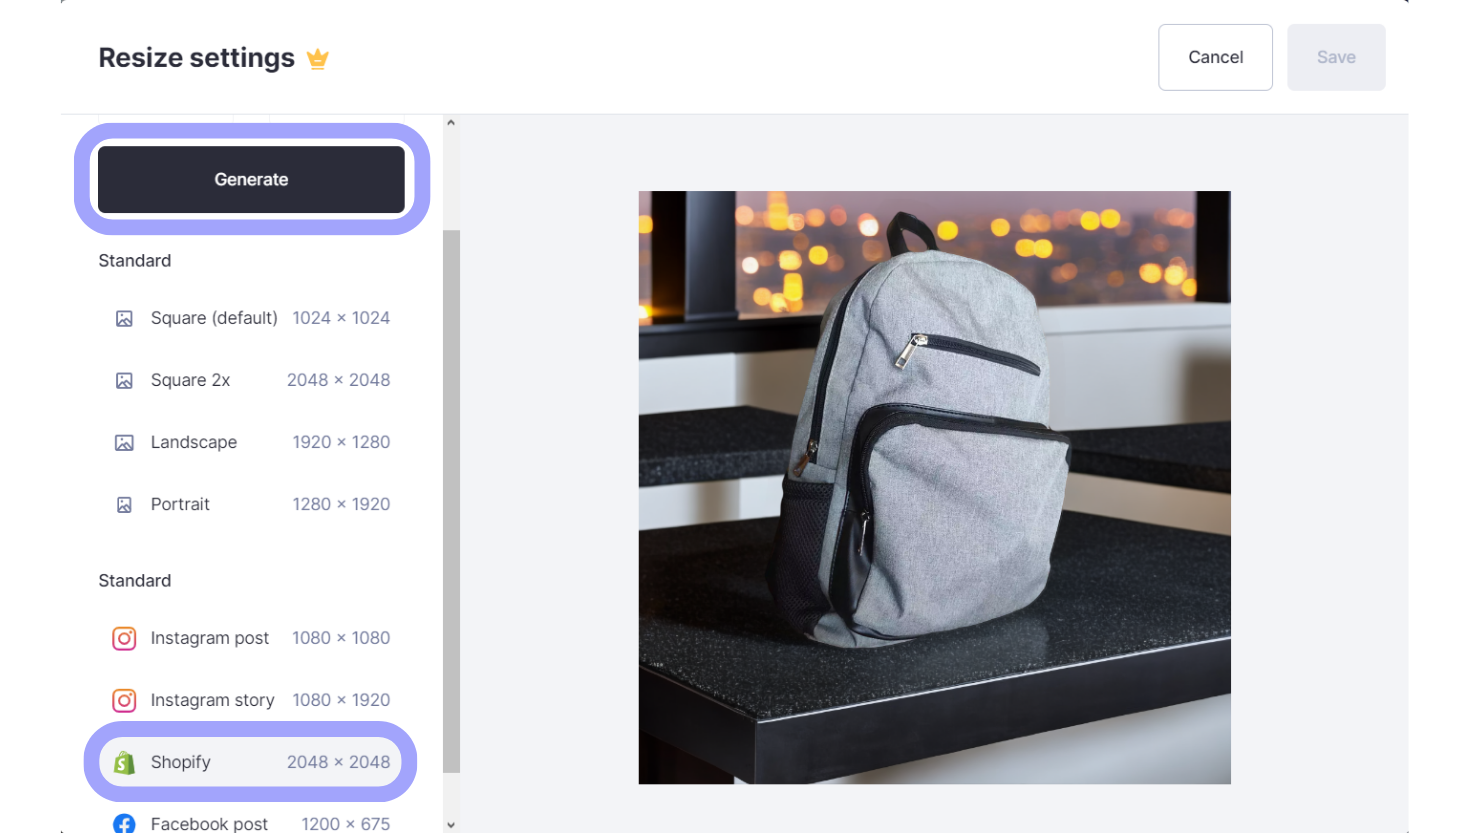
In the panel to the left, under the Standard category, select the Shopify option, which will upscale the 1024x1024px rendering to 2048x2048px and optimizing it for Shopify. Then click Generate at the top to render.
Once the processing finishes, either click Download or Save which will save it to the AI Photoshoot dashboard without downloading it.
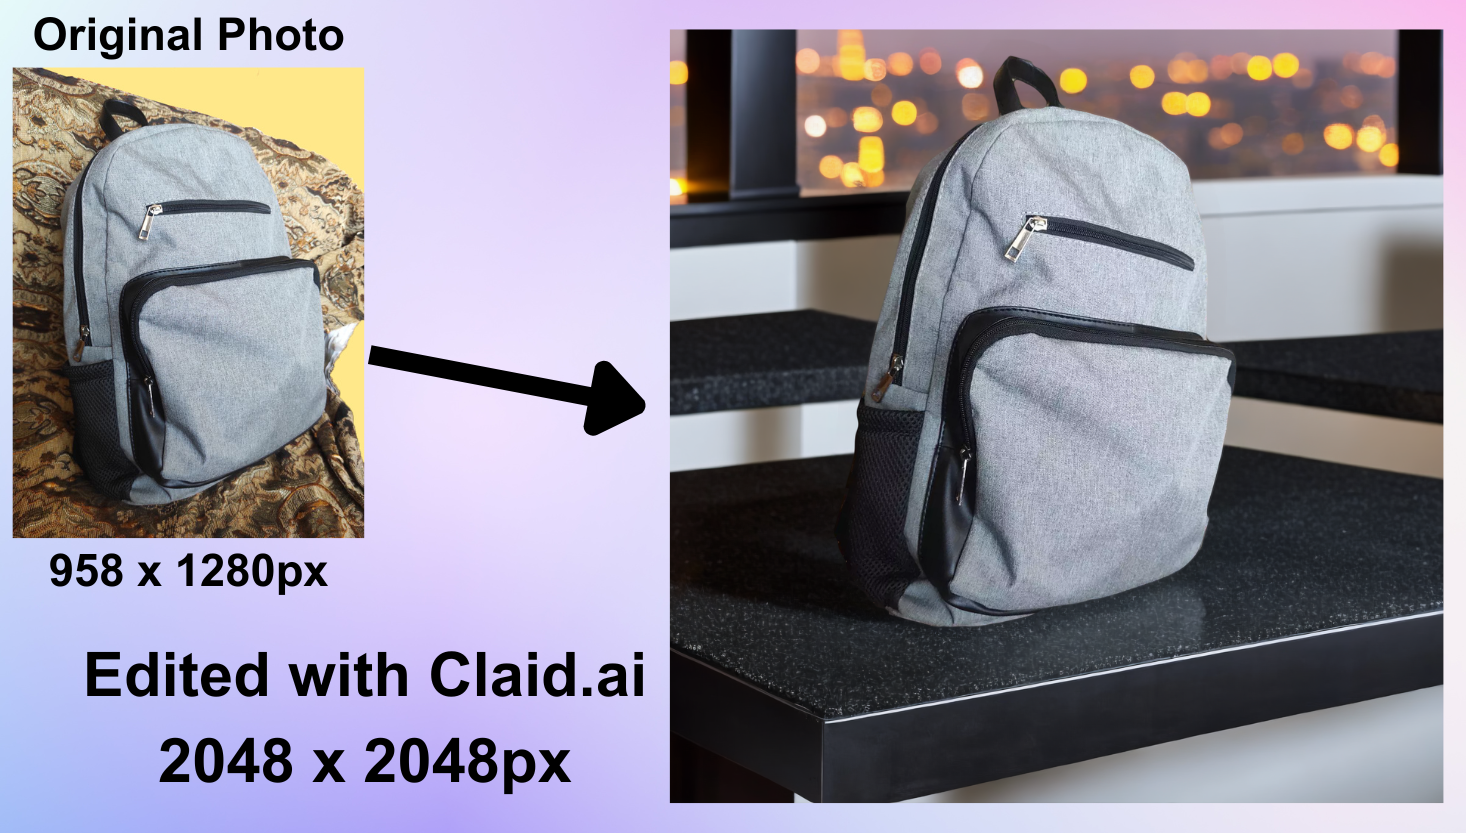
Before and After
And just like that, within a few minutes, a standard photo, taken with a very phone camera, is turned into a sleek product visual ready for listing on Shopify stores.
Generate backgrounds, enhance images, and optimize them for eCommerce marketplaces all on one convenient platform, Claid.ai.
FAQ
How do I change my product preview image on Shopify?
The preview or hero shot of a product listing on Shopify is determined by which photo is located in the leftmost big media slot.
To change the product preview, simply drag and drop it into the big slot to the left.
Can you bulk edit Shopify pictures?
While there are no options for bulk editing product photos on the Shopify platforms itself, users have a number of options to pick from that allow you to edit multiple images at once. For example, Claid.ai Image Editing studio allows users to copy the code from thei edits they’ve made to product images on the Claid.ai dashboard and save it to edit other images.
There are also a number of ways to integrate Claid.ai and its many functions onto different platforms to automatically optimize product photos to set platform guidelines, without having to manually edit every image through Claid.ai.
Need this at scale?
Process thousands of images via API, or let our team handle it for you.


Claid.ai
January 26, 2024